Here are my studies and experiments using ANTLR4 (for language analysis). The target code in this case is in C++, and for this a base project is used, which can be found here:
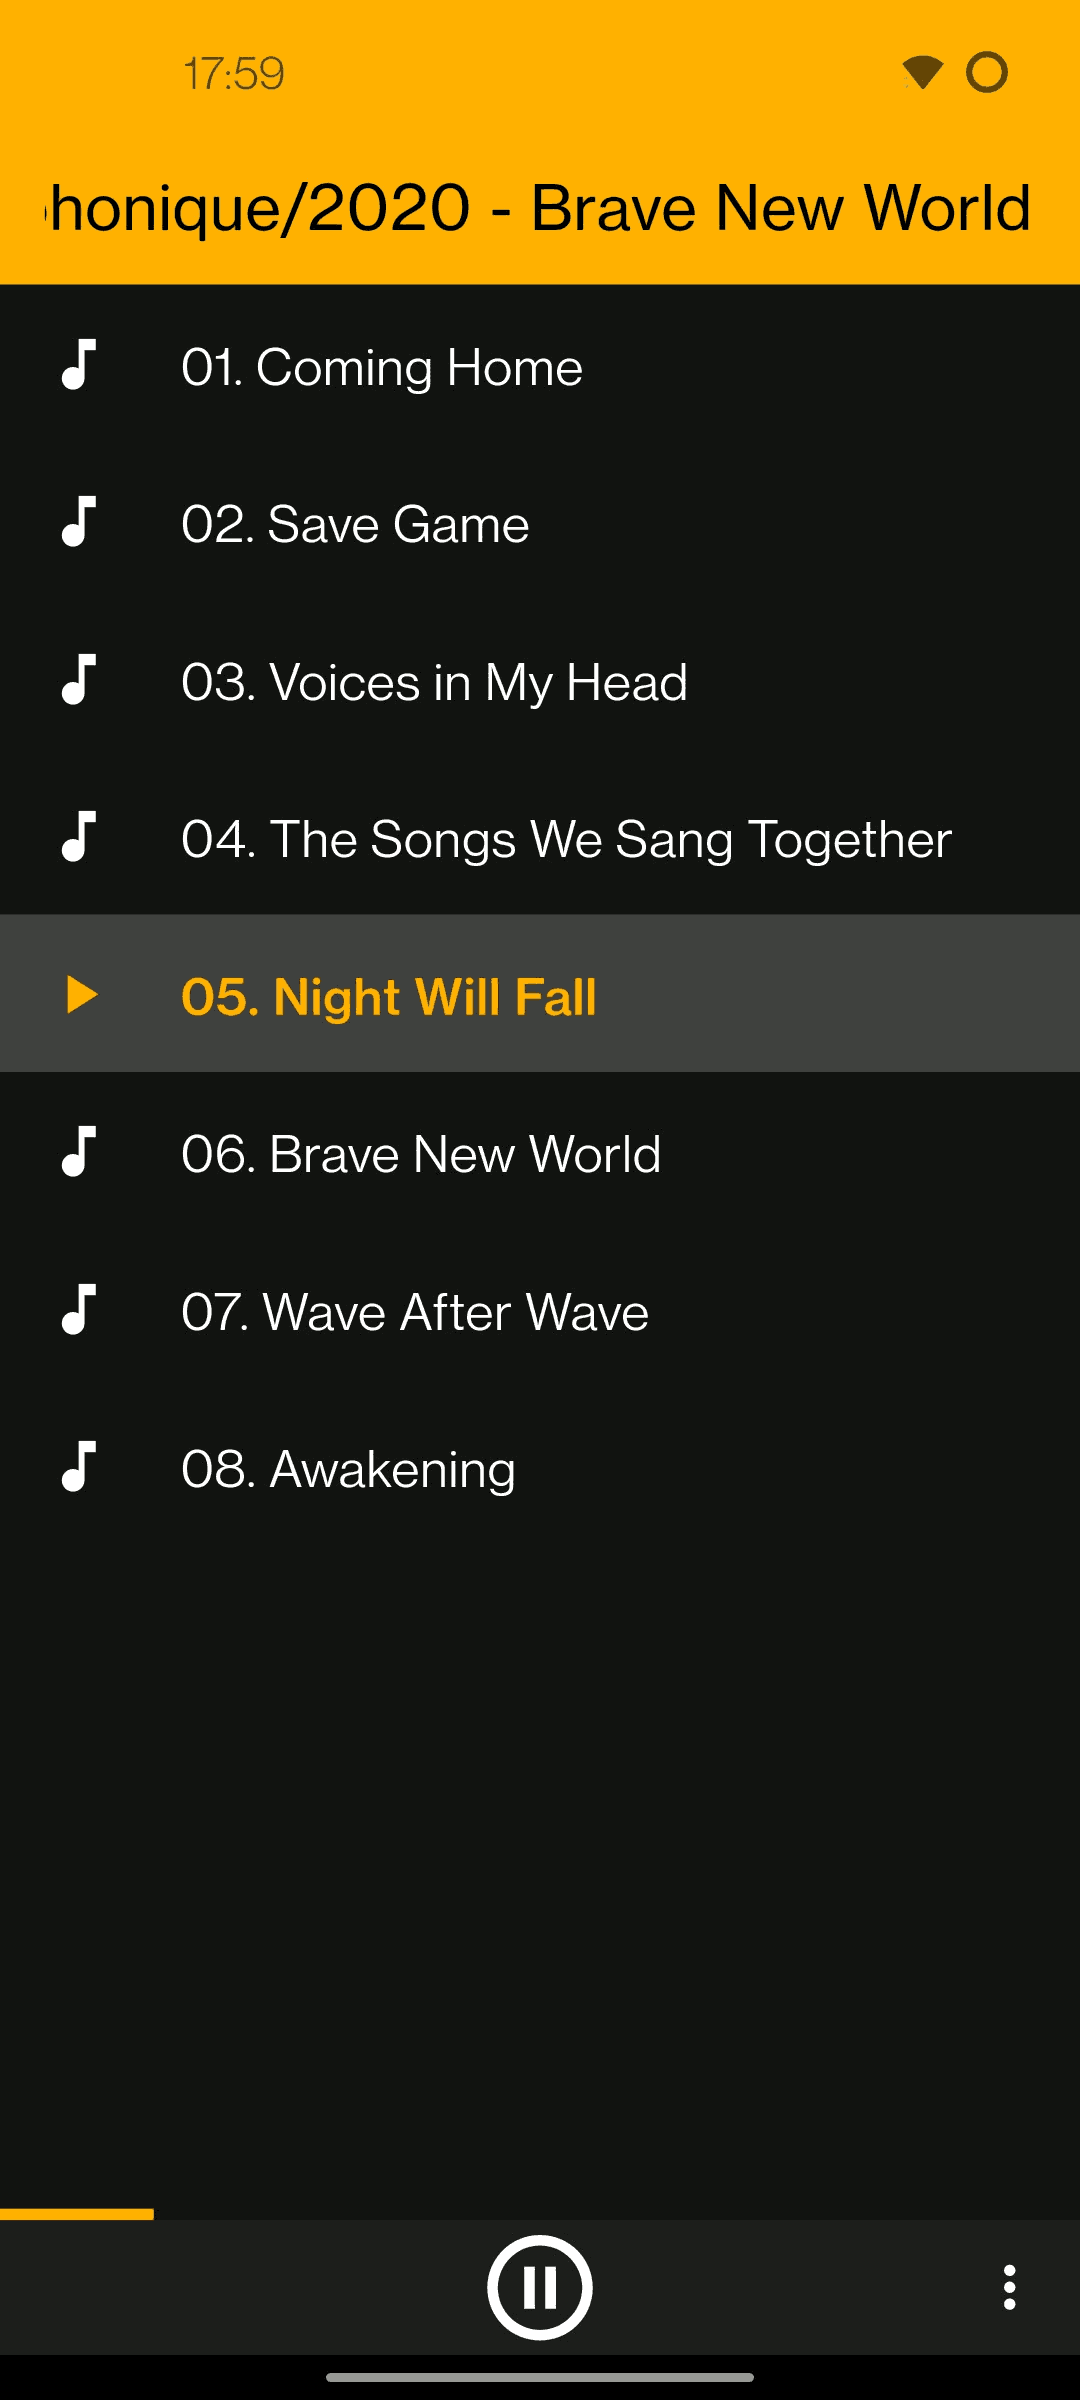
A bare-bones music player.
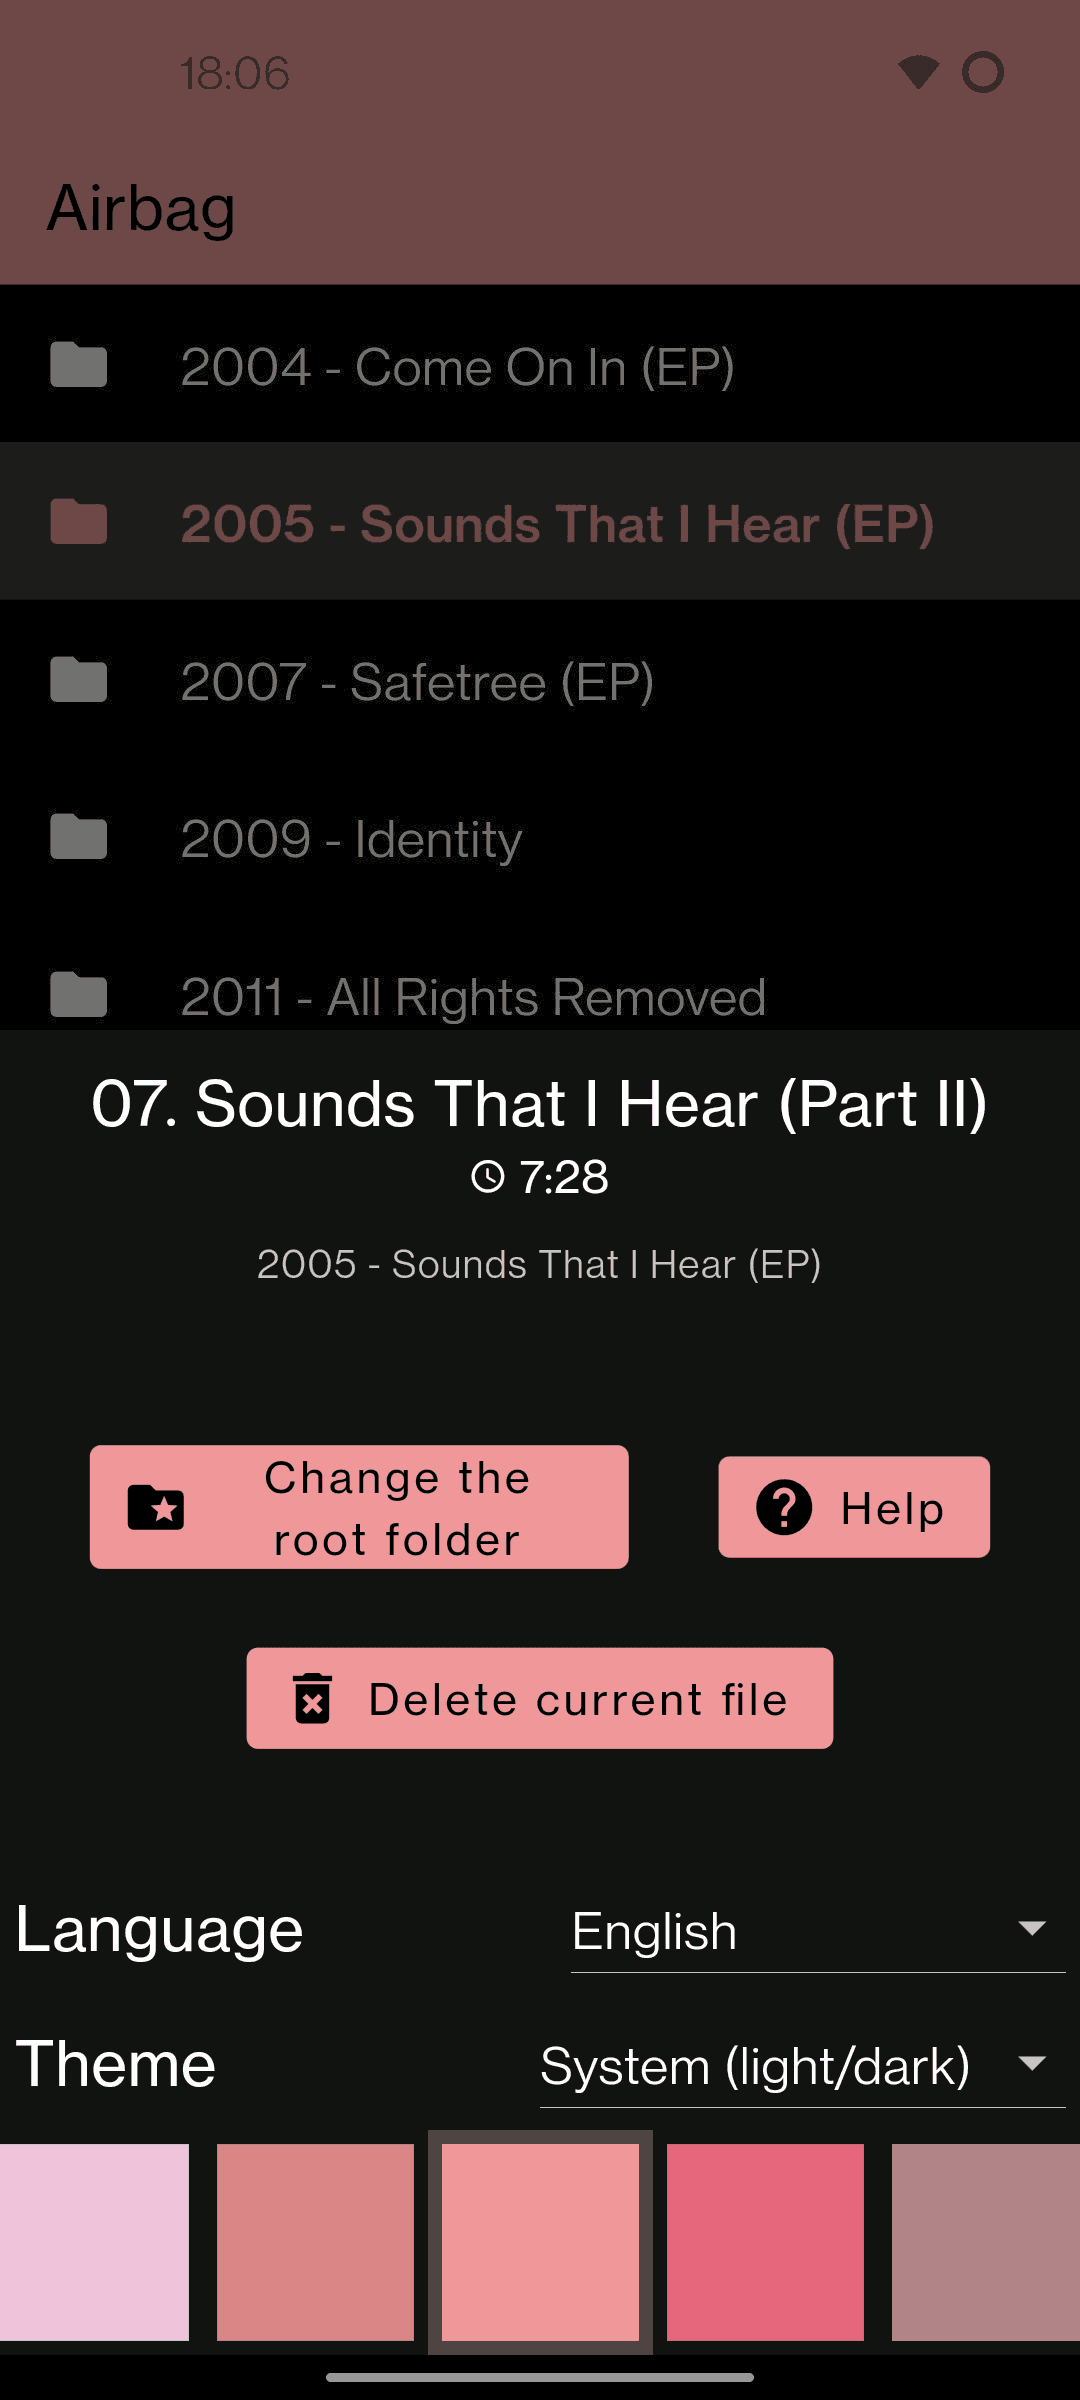
Intended to utilize a filesystem to browse your music instead of automatically grouping by artist, album or genre.
Focused on gesture controls.
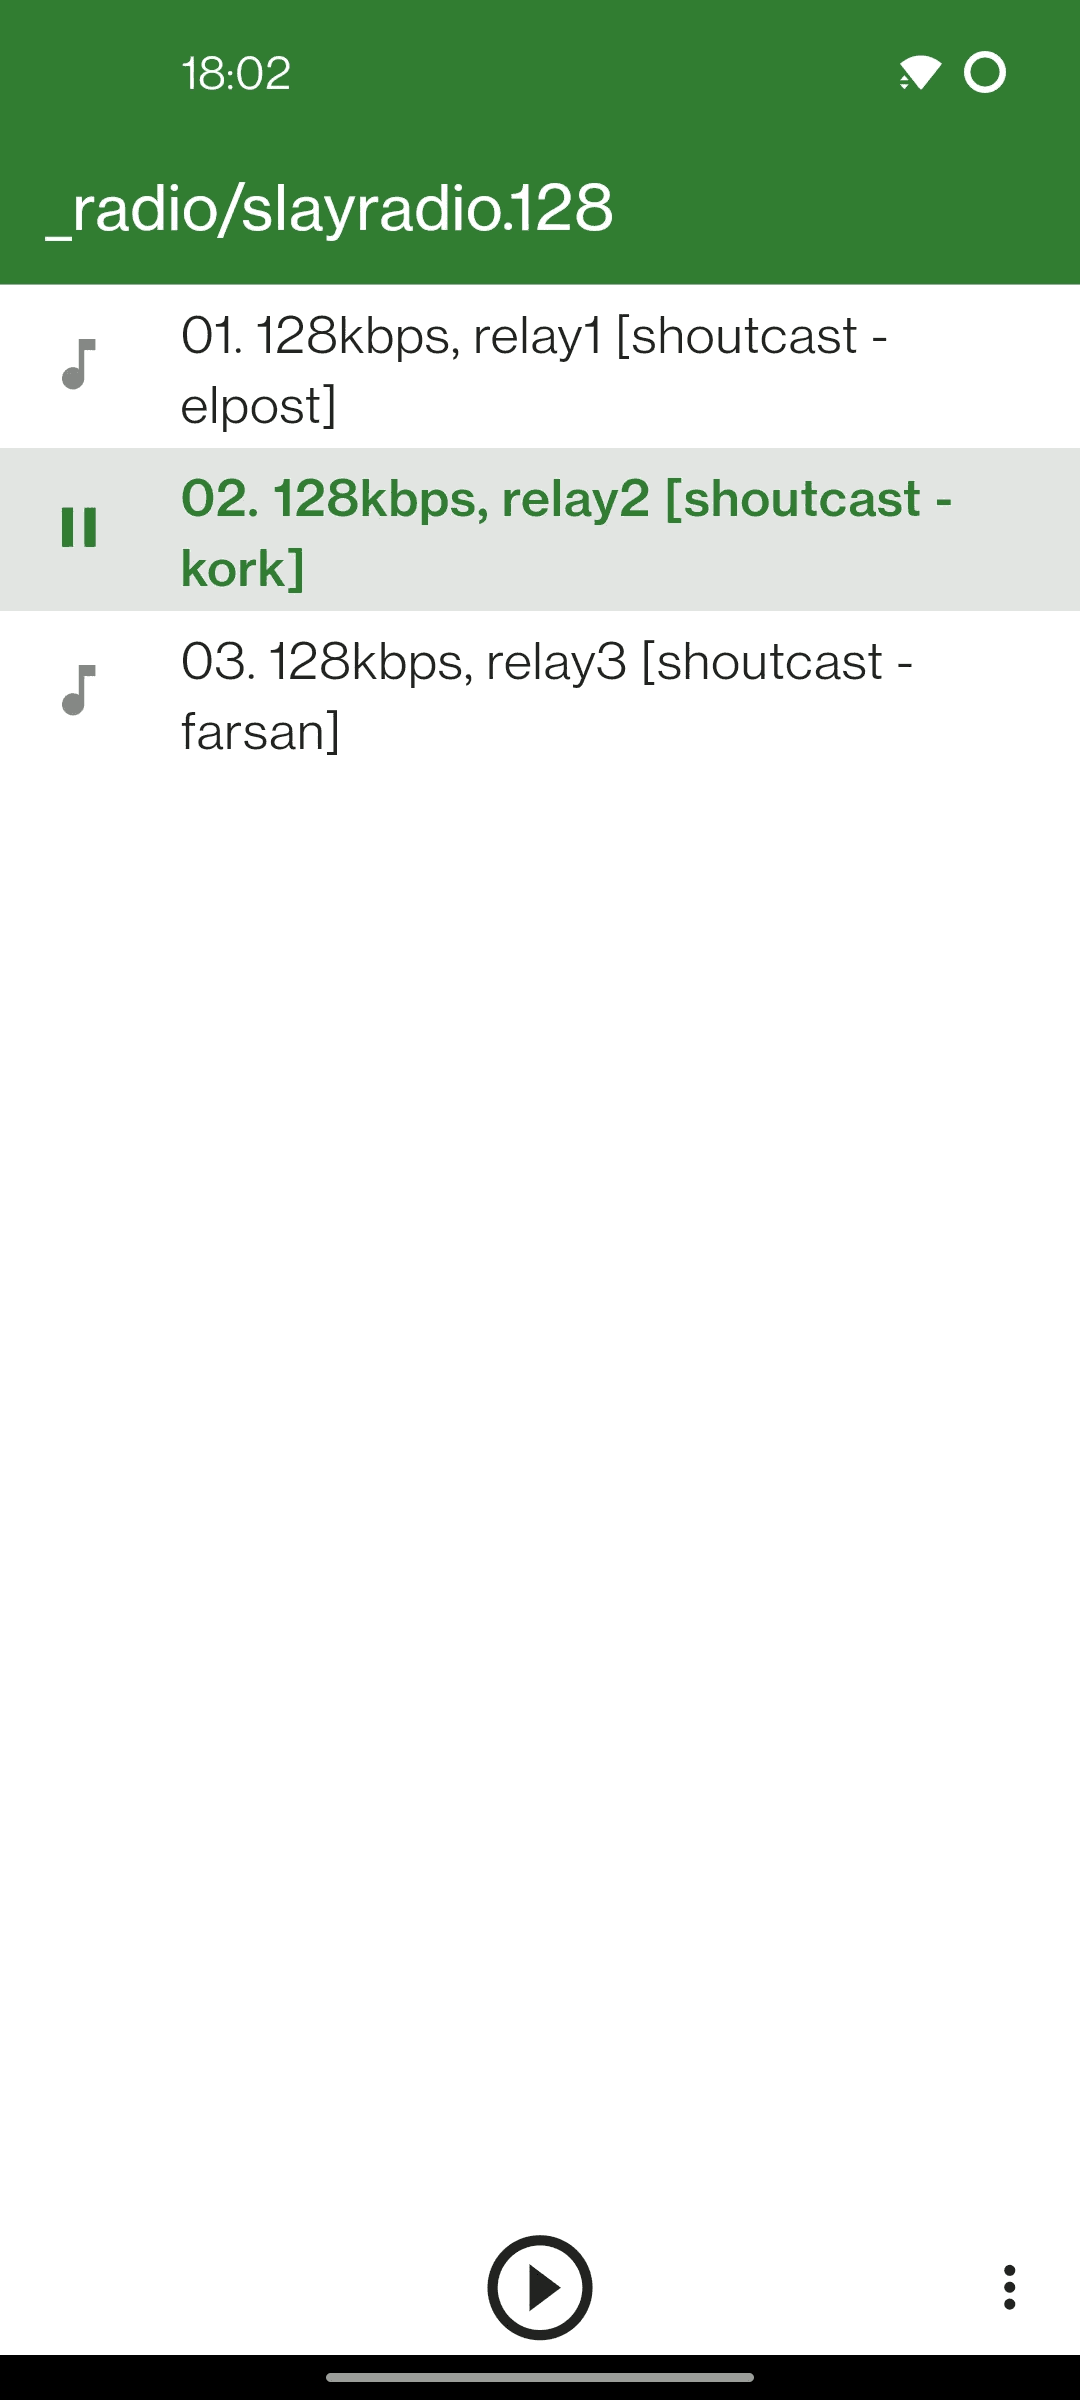
Supports CUE sheets, M3U playlists and Internet radio.
Minimum supported Android version: 5.0 (Lollipop, API 21)
Features
Here’s what you can do in SonusPresto:
play music
browse your music in the way you have structured it, using the filesystem
play all files in a selected folder and sub-folders recursively
open CUE sheets and M3U playlists as folders
gapless playback
play Internet radio from M3U playlists
change a visual theme and language (English/Russian)
control a playback using touch and swipe gestures on a single button
listen to the audio from the video files
delete files and folders
Non-features
Here’s what SonusPresto can’t do:
view audio tags or cover art
quickly set a precise playback position
view the current playback position in seconds
use a separate buttons to control a playback (i.e. there’s no separate prev/stop/next/… buttons)
create custom playlists or manage a playback queue
basically, anything else that is not listed in the “Features” section 🙂
Disclaimer: new features will most likely never be added.
Specifics
Here are some quirks:
the swiping of the bottom button may not work on some devices with specific Android gesture settings
since SonusPresto doesn’t read tags, it can’t determine actual artist and album name of a music track and instead it just uses folder names for that (except for playlist items)
SonusPresto may not be compatible with LastFM scrobblers, i.e. it will most likely send incorrect info because it does not use tags
SonusPresto doesn’t know what formats your device supports, so it will just show every file that has any of the supported extensions
(i.e. not all displayed files can actually be played)
Install Flutter and Android SDK. It’s easier to do it from Android Studio.
At this point you can already debug the application from Android Studio.
To build the release version follow the next steps.
Go inside the repository root and create the file
android/key.properties based on android/key.template.properties.
Fill in all fields.
For more information see the official “Signing the app” tutorial.
To build the release APK run ./build-apk.sh inside the repository root.
React HOC (higher order component) method, and React Hook for transforming
your favorite components to animate prop values on change.
This package uses Tweenkle for handling
the tweening of prop values. It’s not as full-featured as GSAP,
but it works pretty well for basic value and object tweening.
react-animate-props now offers two(!) ways for you to animate the props in both
your class-based, and functional, React components.
Hook
useAnimateProps
Parameters
prop : Number – Value to animate
options : Object – Options to define the tween properties to use.
Default options:
{delay: 0,// Delay to apply before the tween startsduration: 1000,// Duration of the tween in millisecondsease: Easing.Quad.Out,// Ease to use for the tween, @see [Tweenkle](https://github.com/ryanhefner/tweenkle) for optionsonAnimateProgress: value=>value,// Callback to use during the tweening process, as well as being able to manipulate the value during the tweenonAnimateComplete: value=>value,// Callback for when the tween has completed, as well as being able to manipulate the final value of the tween}
Example
importReactfrom'react';import{Easing}from'tweenkle';import{useAnimateProps}from'react-animate-props';constAnimatedNumberLabel=({ number })=>{constanimatedNumber=useAnimateProps(number,{ease: Easing.Quad.In,delay: 500,duration: 1500,onAnimateProgress: value=>{returnMath.round(value);},onAnimateComplete: value=>{returnMath.round(value);},});return<span>{animatedNumber}</span>;};exportdefaultAnimatedNumberLabel;
HOC (Higher Order Component)
animateProps is a higher order component
that allows you to easily create components who’s props animate when changed.
Whether you’re writing a new component, or would like to make an animated version
of an existing component, just export your component and pass it through, animateProps.
Parameters
component:Class – Class to apply animateProps logic to.
defaultProps:Object – Default props declared for the component being animated. (Default: {})
Properties
animatedProps:Object – Object defining which props to animate, and the tween
settings for each. animateProps uses the Tweenkle
tweening library, specifically a Tween instance, and you can pass whatever props that
library supports via the tween settings. You can find out more by reading the Tweenkle README.
onAnimateProgress:Function – Callback available to manipulate the prop before
it is applied to the state. (Example: (prop, value) => { return { [prop]: value }; })
onAnimateComplete:Function – Callback fired when the animation for a prop completes.
(Example: (prop, value, tweensActive) => {})
MD_MIDIFile Standard MIDI File Interpreter Library
This library allows Standard MIDI Files (SMF) to be read from an SD card and played through a MIDI interface. SMF can be opened and processed, with MIDI and SYSEX events passed to the calling program through callback functions. This allows the calling application to manage sending to a MIDI synthesizer through serial interface or other output device, such as a MIDI shield.
SMF playing may be controlled through the library using methods to start, pause and restart playback.
SMF may be automatically looped to play continuously.
Time ticks are normally generated by the library during playback, but this can be taken over by the user program if different time or synchronization with external MIDI clock is required.
External dependencies:
SdFat library found here used by the library to read SMF from the the SD card.
MIDI interface hardware as described in the library documentation or similar, a USB interface with converter or a MIDI shield.
If you like and use this library please consider making a small donation using PayPal
Most of your CLI tools were probably installed with a package manager like apt or dnf on Linux, Homebrew on macOS, or Scoop on Windows. Then if you want to get the list of your installed tools, you can run apt list --installed, brew list or scoop list to list them, and if you want to know more about one of them you can run apt show ..., brew info ... or scoop info ....
But what about the ones you installed with Go? You installed them with go install ... and they live in $GOPATH/bin or $GOBIN or maybe you move/symlink them to /usr/local/bin or so.
Now you don’t immediately know the origin of the tools. For example if there’s a binary called arc, is it github.com/mholt/archiver/v3/cmd/arc or github.com/evilsocket/arc/cmd/arc?
You could run arc --help and it might give a hint what exactly it is, but it’s not reliable
Or you run go version -m /path/to/arc and among the dozens of output lines you check the path or mod
But their values are not https://-prefixed, so you can’t click them in your terminal and have to copy paste them into your browser
Then for example arc has the module path github.com/mholt/archiver/v3, which leads to a 404 Not Found error on GitHub because of the v3
And for staticcheck the module path is honnef.co/go/tools, which is a vanity URL that doesn’t point to the original Git repository (https://github.com/dominikh/go-tools) and the browser also doesn’t redirect to it
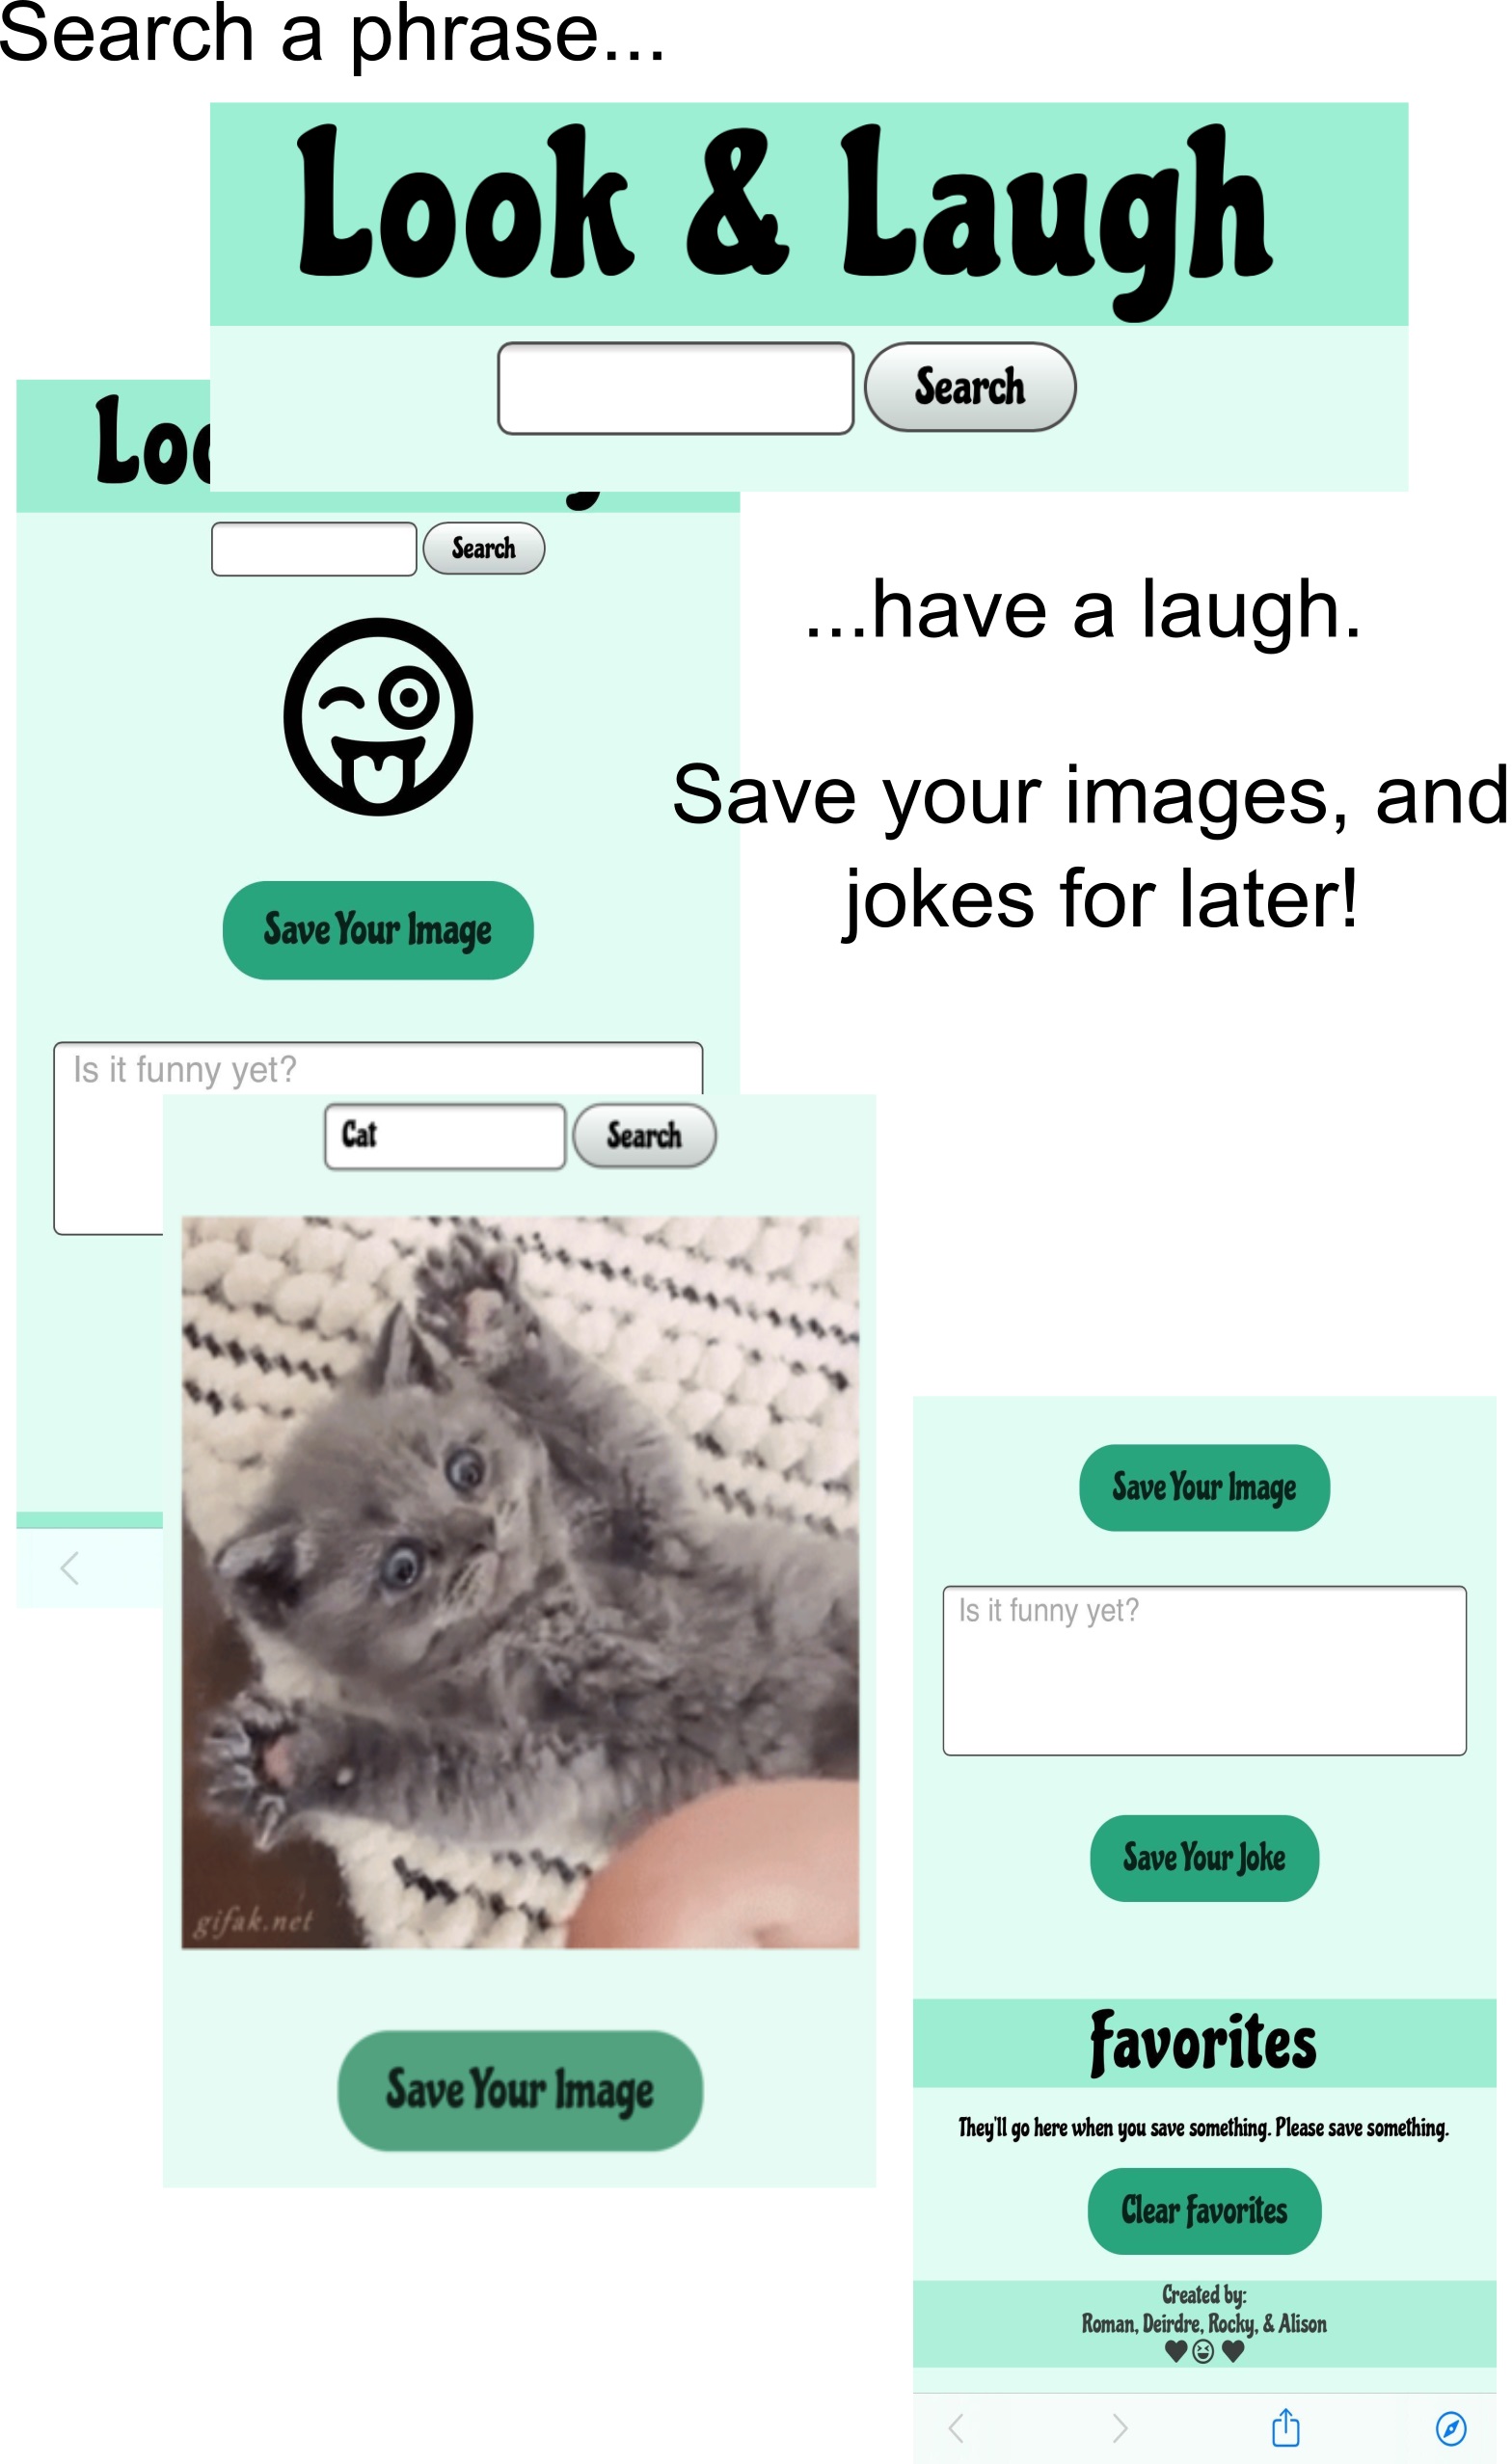
Files contain the Look and Laugh App. A mental health and wellness
application to help relieve stress and anxiety.
Description: Look & Laugh App
“Search a word, have a laugh. Save your images, and jokes for later. Happy Searching!”
As developers of the University of Pennsylvania LPS Bootcamp, we wanted to develop an application that would allow coders to take a quick break to destress
and refocus. The “Look & Laugh” gives coders a way to break a laugh quickly.
The technologies used were:
Zoom, Google Docs, Slack, GitHub, API’s, Google Font’s, HTML, CSS, Pure.css, Javascript, jQuery, AJAX, and Local Storage. For a more extensive preview of each visit the Look & Laugh Google Documentation.
Button configurations:
Search: Returns a randomized image, and/or joke based on user’s search input.
Save: Images, and jokes will be sent to “Favorites” section for user to view later.
Clear: User can clear images, and joke from “Favorites section”.
The contents of this repository detail an analysis of the Pneumonia Image Classification project. This analysis is detailed in hopes of making the work accessible and replicable.
Business problem:
The task is to create a model that can accurately predict whether the patient has Pneumonia or not given a patient’s chest xray image.
Data
Our dataset comes from Kaggle. The dataset contains three folders training, validation and testing. Each folder is filled with chest xray images used for training and testing the model that we will create.
Methods
Descriptive Analysis
Modeling
Choices made
Key relevant findings from exploritory data analysis
Results
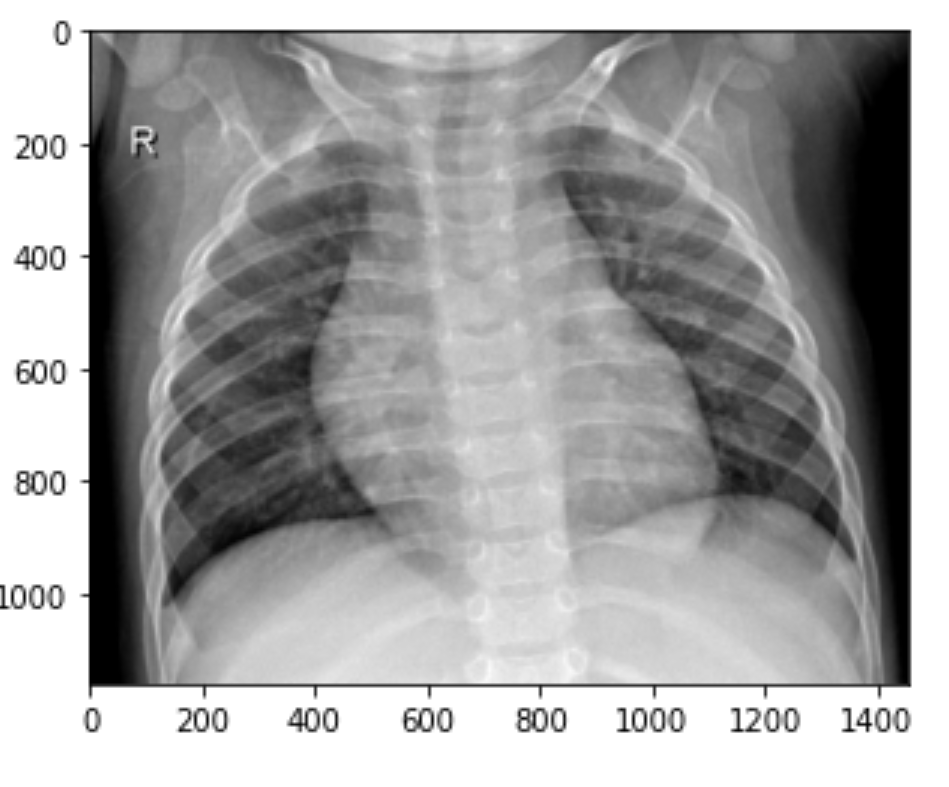
Visual 1
> Normal Chest XRay
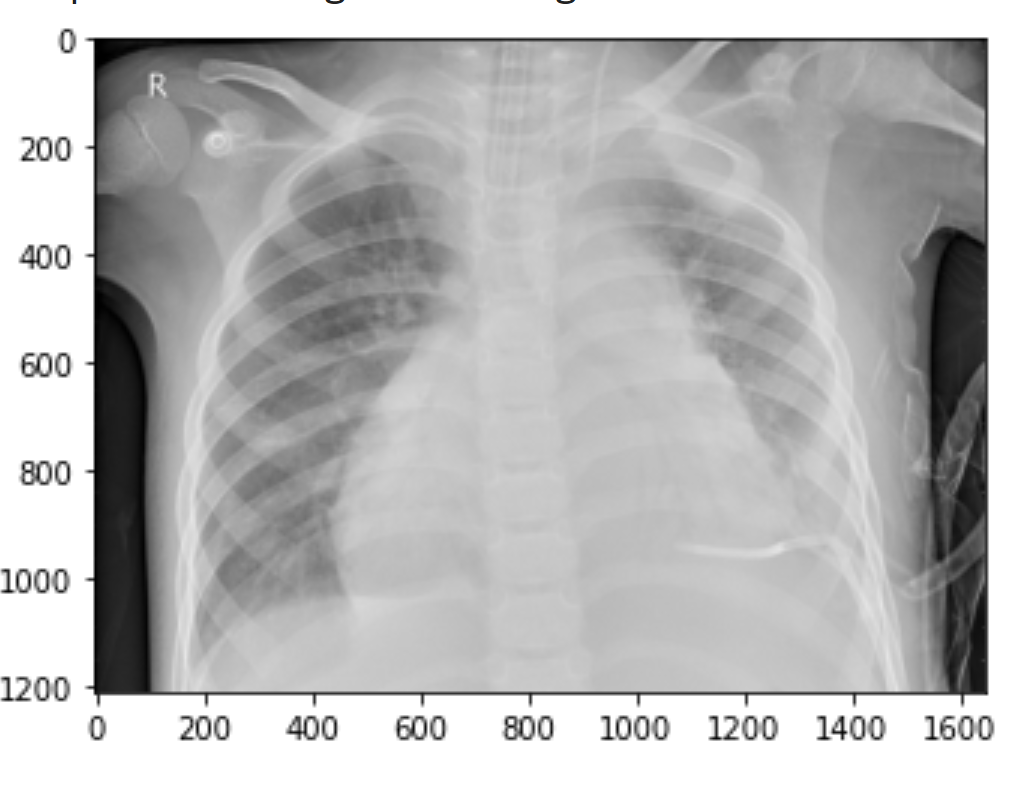
Visual 2
> Pneumonia Chest XRay
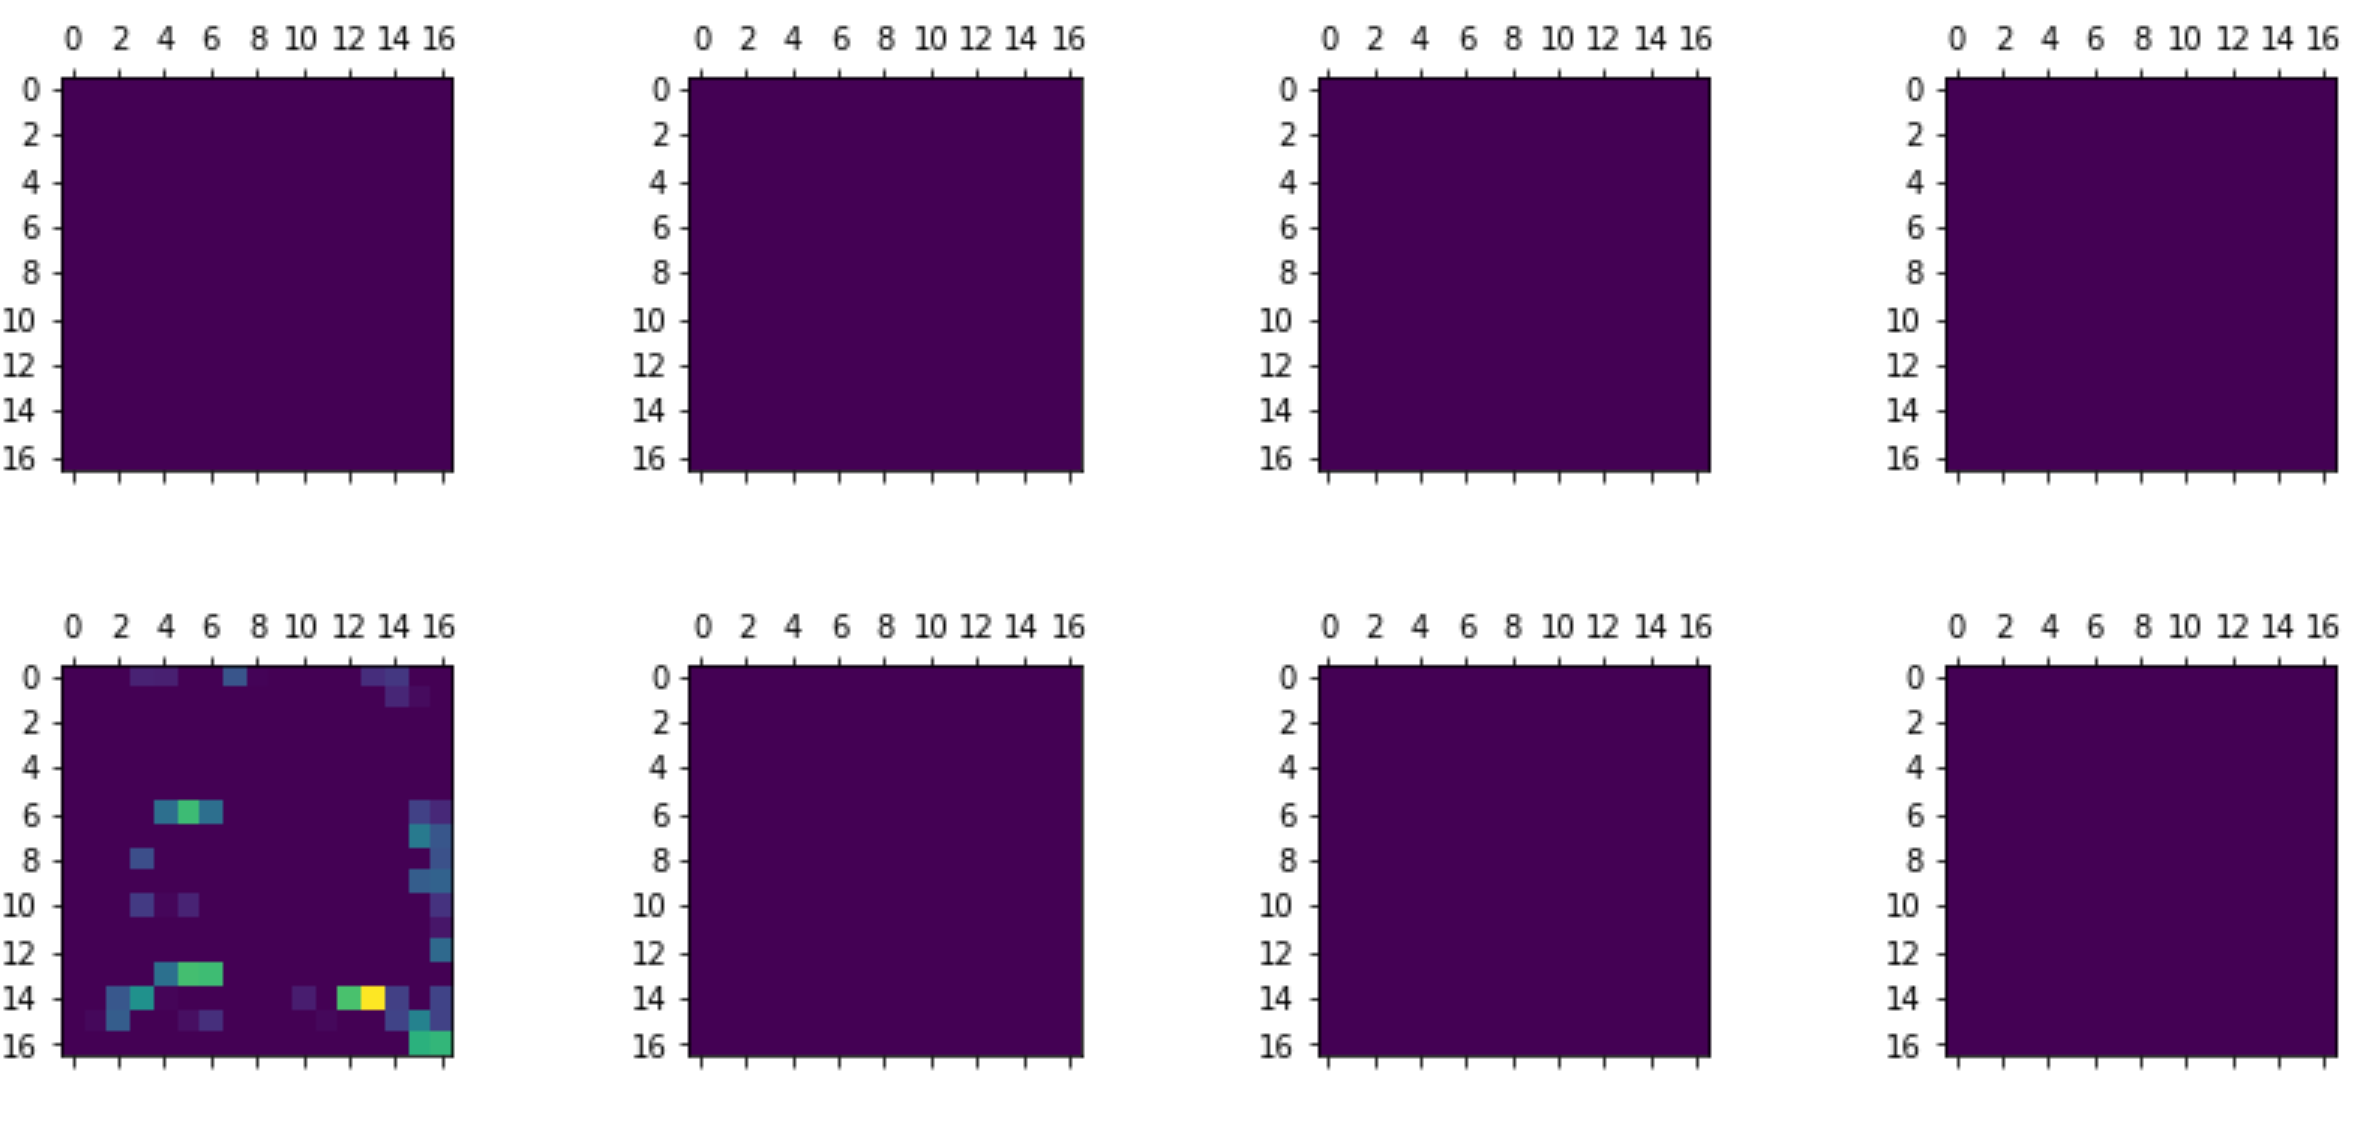
Visual 3
> First Activation of ModelI
Visual 4
> Sixth Activation of ModelI
Models
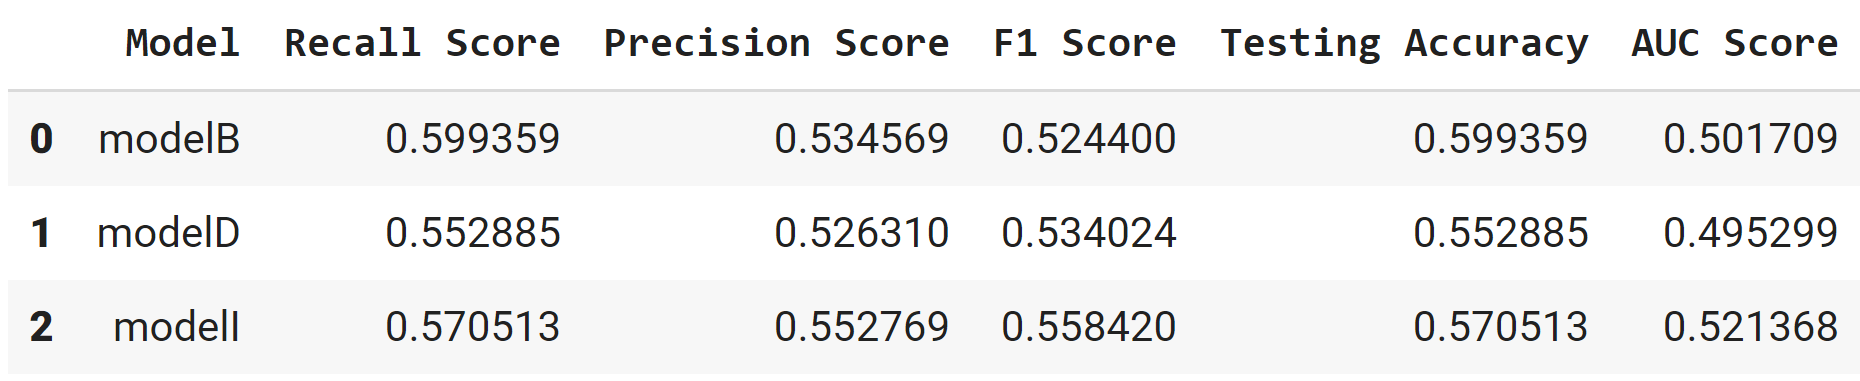
> ROC Curve of the different Models
> Model Results
Accuracy/ Recall – Baseline Model
Precision/F1 Score – Imbalance Model
Recommendations:
To summarize everything above, we can see from above that
Recall/Accuracy – ModelB
Precicion/F1 Score/ AUC – ModelI
Our goal is to minimize the amount of patients we classify as healthy when they do indeed have Pneumonia. Therefore we would want to minimize false negatives in other words maximizing recall. Our recommendation is to stick with ModelI. Although modelB was slightly better in recall and accuracy, there was only a slight difference in the recall and accuracy score. Also ModelI did better in precision score, F1 score and AUC score. Therefore ModelI is the best model to use for predictions.
Limitations & Next Steps
There are many things that we didn’t due to lack of time and money constraints. For example, we can ask a doctor what they would look at in a chest xray image to determine whether a patient has Pneumonia or not. We could also use cross validation or gather more data to further improve our models. (Future Work – Include RNN Model)
Here is where you would describe the structure of your repoistory and its contents, for example:
├── README.md                       <- The top-level README for reviewers of this project.
├── Image Classification.ipynb             <- narrative documentation of analysis in jupyter notebook
├── presentation.pdf                <- pdf version of project presentation
└── Visualizations
    └── images                          <- both sourced externally and generated from code
The contents of this repository detail an analysis of the Pneumonia Image Classification project. This analysis is detailed in hopes of making the work accessible and replicable.
Business problem:
The task is to create a model that can accurately predict whether the patient has Pneumonia or not given a patient’s chest xray image.
Data
Our dataset comes from Kaggle. The dataset contains three folders training, validation and testing. Each folder is filled with chest xray images used for training and testing the model that we will create.
Methods
Descriptive Analysis
Modeling
Choices made
Key relevant findings from exploritory data analysis
Results
Visual 1
> Normal Chest XRay
Visual 2
> Pneumonia Chest XRay
Visual 3
> First Activation of ModelI
Visual 4
> Sixth Activation of ModelI
Models
> ROC Curve of the different Models
> Model Results
Accuracy/ Recall – Baseline Model
Precision/F1 Score – Imbalance Model
Recommendations:
To summarize everything above, we can see from above that
Recall/Accuracy – ModelB
Precicion/F1 Score/ AUC – ModelI
Our goal is to minimize the amount of patients we classify as healthy when they do indeed have Pneumonia. Therefore we would want to minimize false negatives in other words maximizing recall. Our recommendation is to stick with ModelI. Although modelB was slightly better in recall and accuracy, there was only a slight difference in the recall and accuracy score. Also ModelI did better in precision score, F1 score and AUC score. Therefore ModelI is the best model to use for predictions.
Limitations & Next Steps
There are many things that we didn’t due to lack of time and money constraints. For example, we can ask a doctor what they would look at in a chest xray image to determine whether a patient has Pneumonia or not. We could also use cross validation or gather more data to further improve our models. (Future Work – Include RNN Model)
Here is where you would describe the structure of your repoistory and its contents, for example:
├── README.md                       <- The top-level README for reviewers of this project.
├── Image Classification.ipynb             <- narrative documentation of analysis in jupyter notebook
├── presentation.pdf                <- pdf version of project presentation
└── Visualizations
    └── images                          <- both sourced externally and generated from code
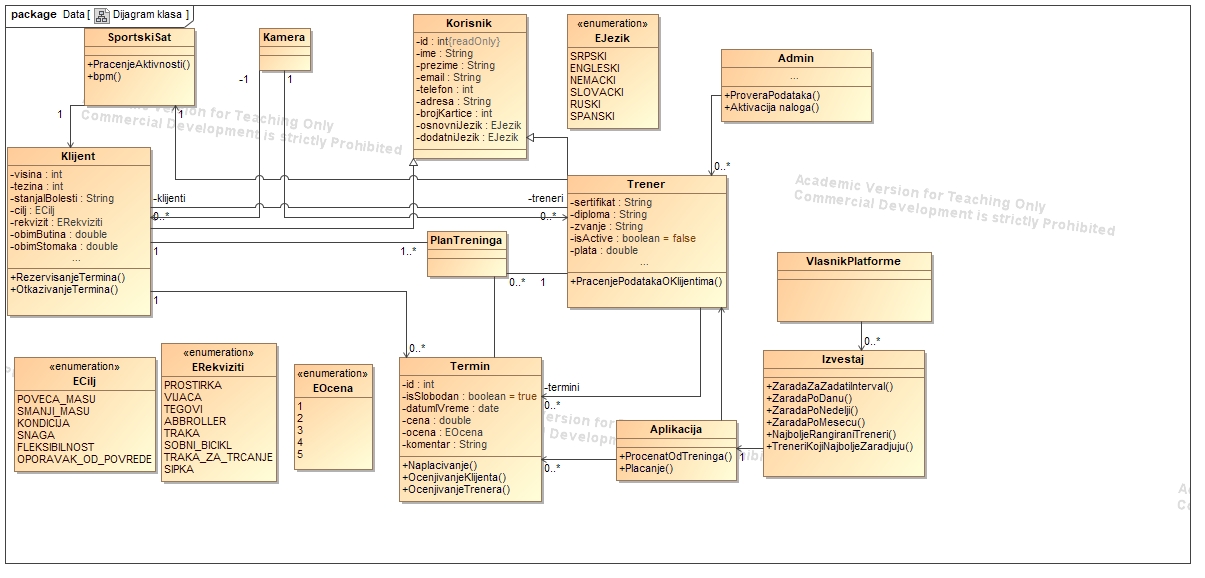
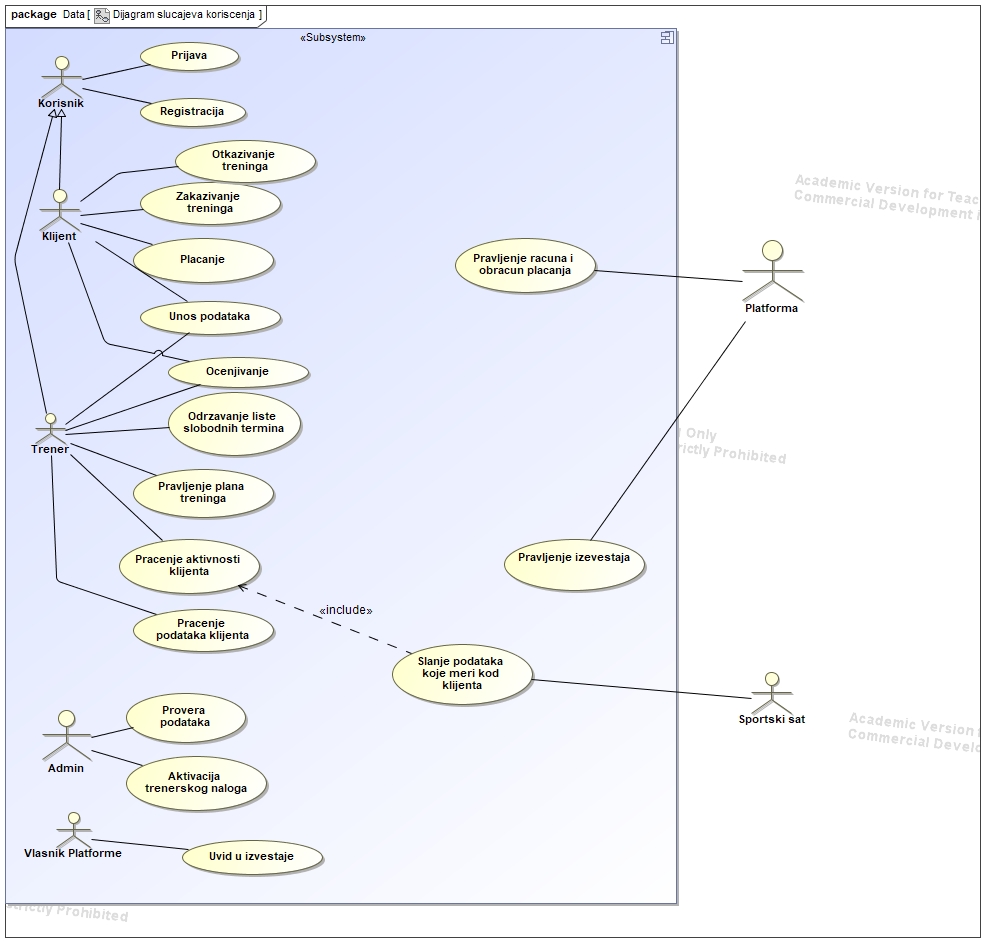
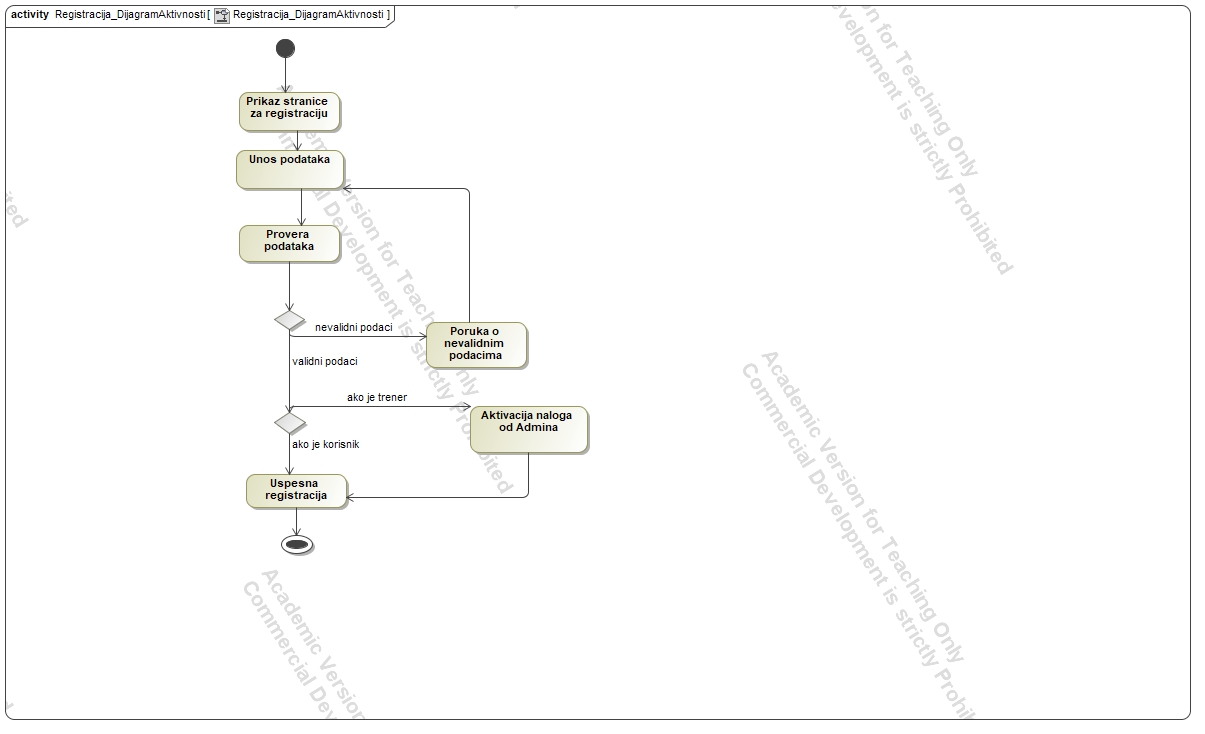
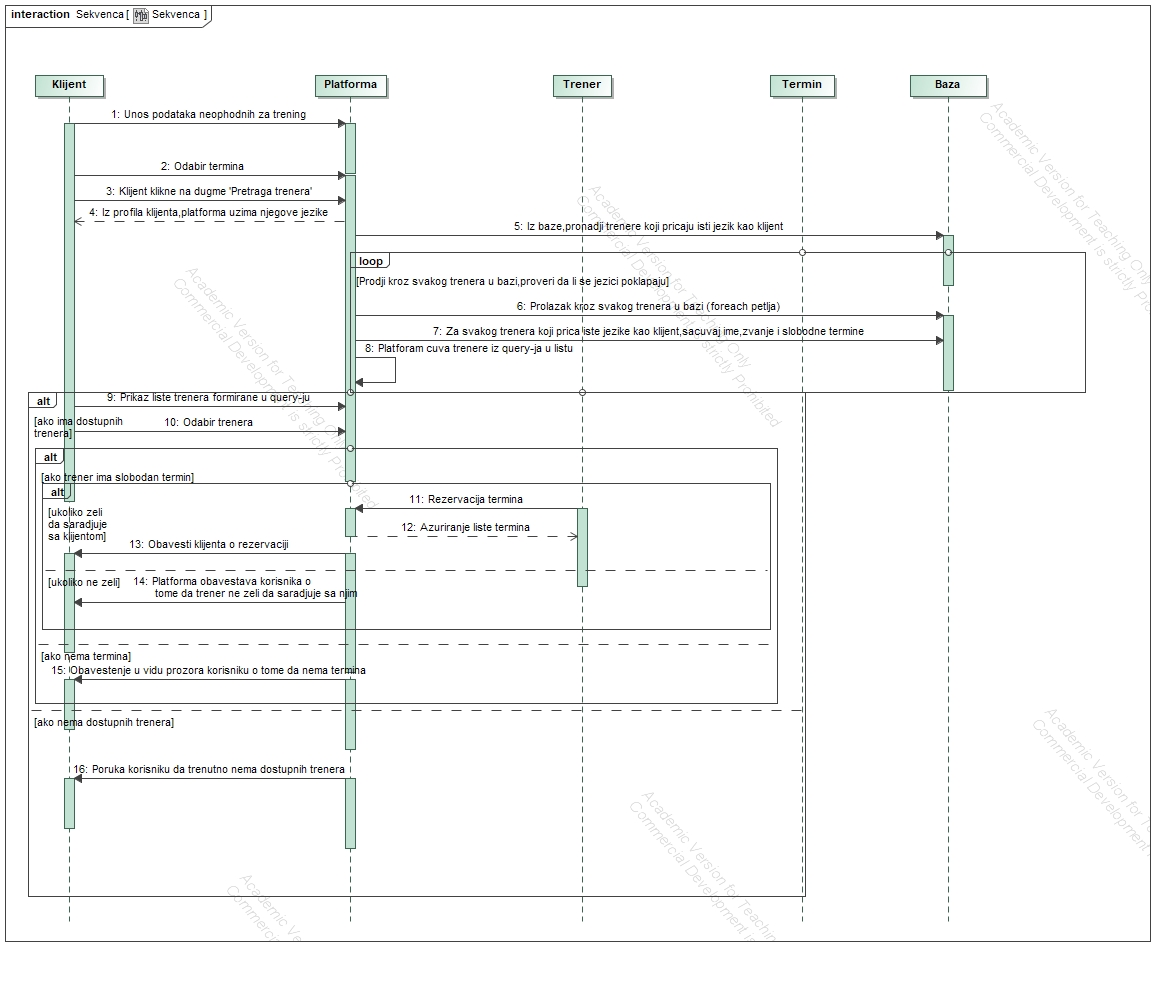
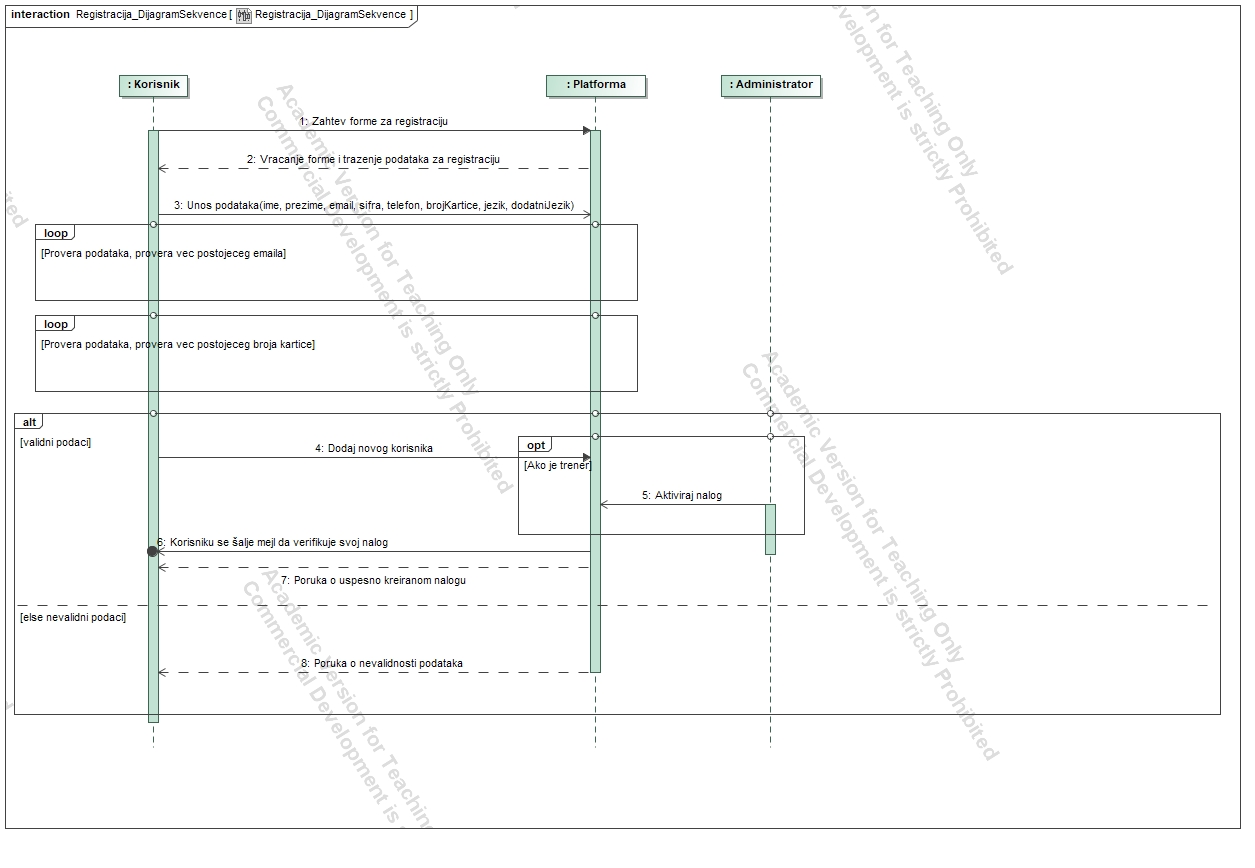
This project focuses on developing a web-based MVC (Model-View-Controller) application for scheduling online fitness training sessions.
The primary emphasis during the implementation was on creating essential UML (Unified Modeling Language) diagrams, including Class Diagrams, Activity Diagrams, Sequence Diagrams, and Use Case Diagrams.
Clients provide additional details: height, weight, health status, goals, and a list of home workout equipment.
Trainers input qualifications, certificates, and titles. The account becomes active upon admin approval.
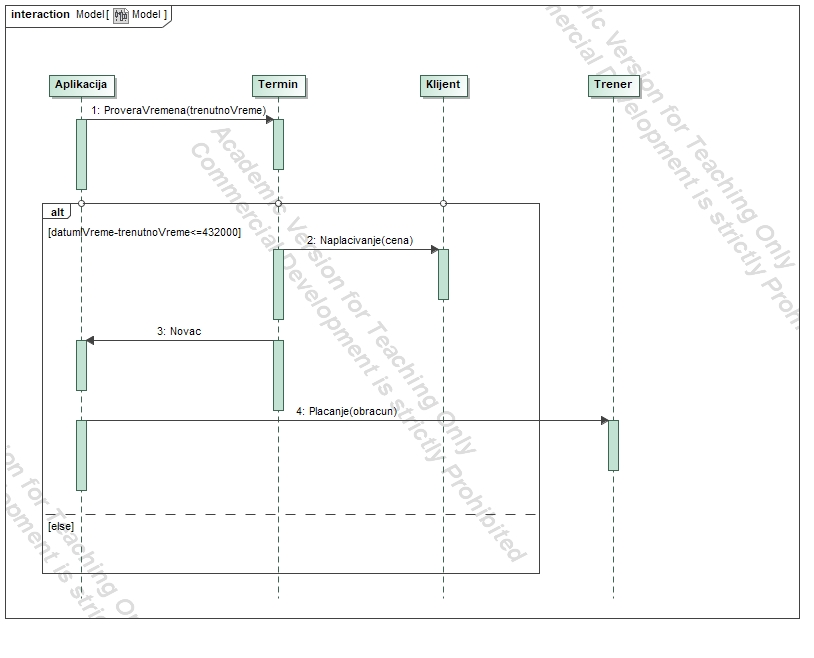
Schedule and Booking:
Trainers maintain a list of available slots for the next month.
Clients can book slots with any trainer.
The schedule considers time zones of both clients and trainers.
Cancellation is allowed up to two hours before the session, after which it incurs a charge.
Finances:
A percentage of each training fee goes to the platform.
Clients can work with different trainers for their sessions.
Conducting Training:
Trainers tailor workouts to clients’ equipment and goals.
During sessions, trainers monitor clients via camera and data from sports devices.
Clients can input data regarding weight changes and other parameters.
Ratings and Progress Tracking:
After each session, both the trainer and client provide ratings (stars and comments).
Trainers can track the progress of clients they’ve worked with.
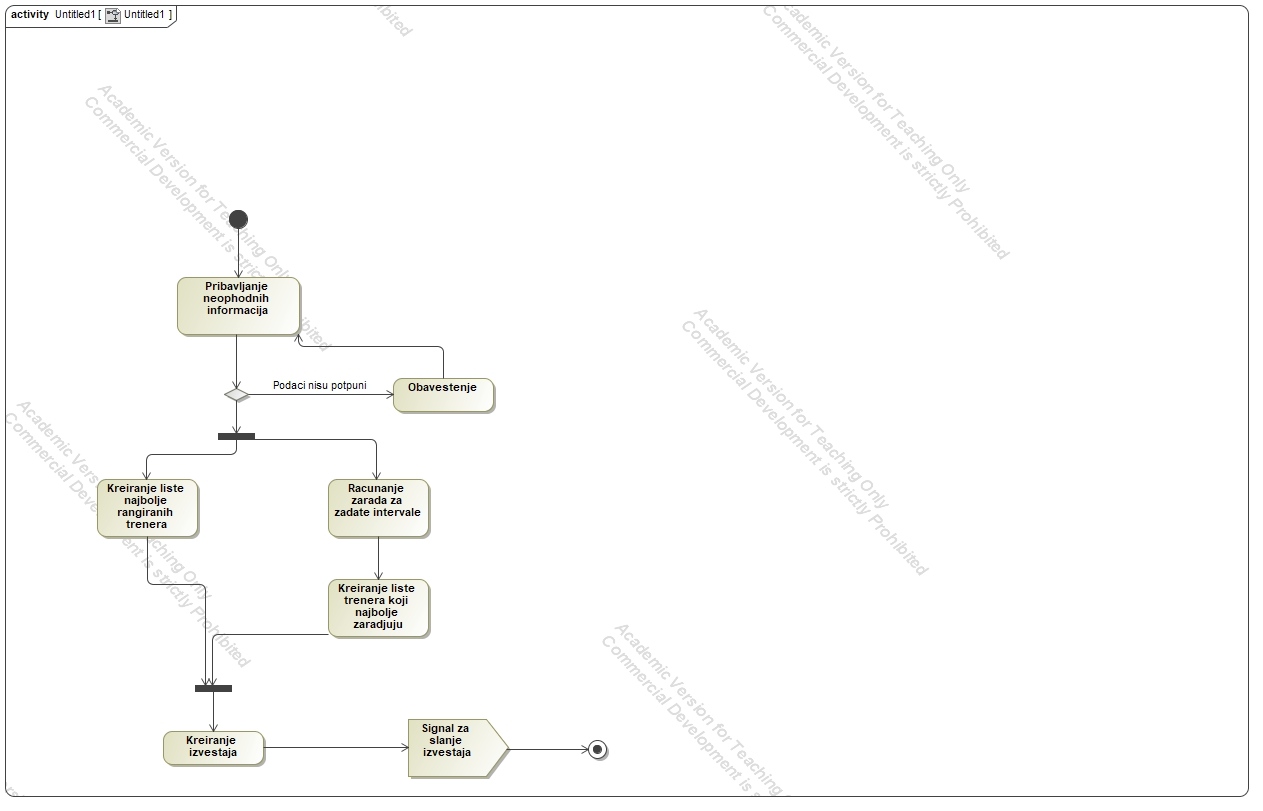
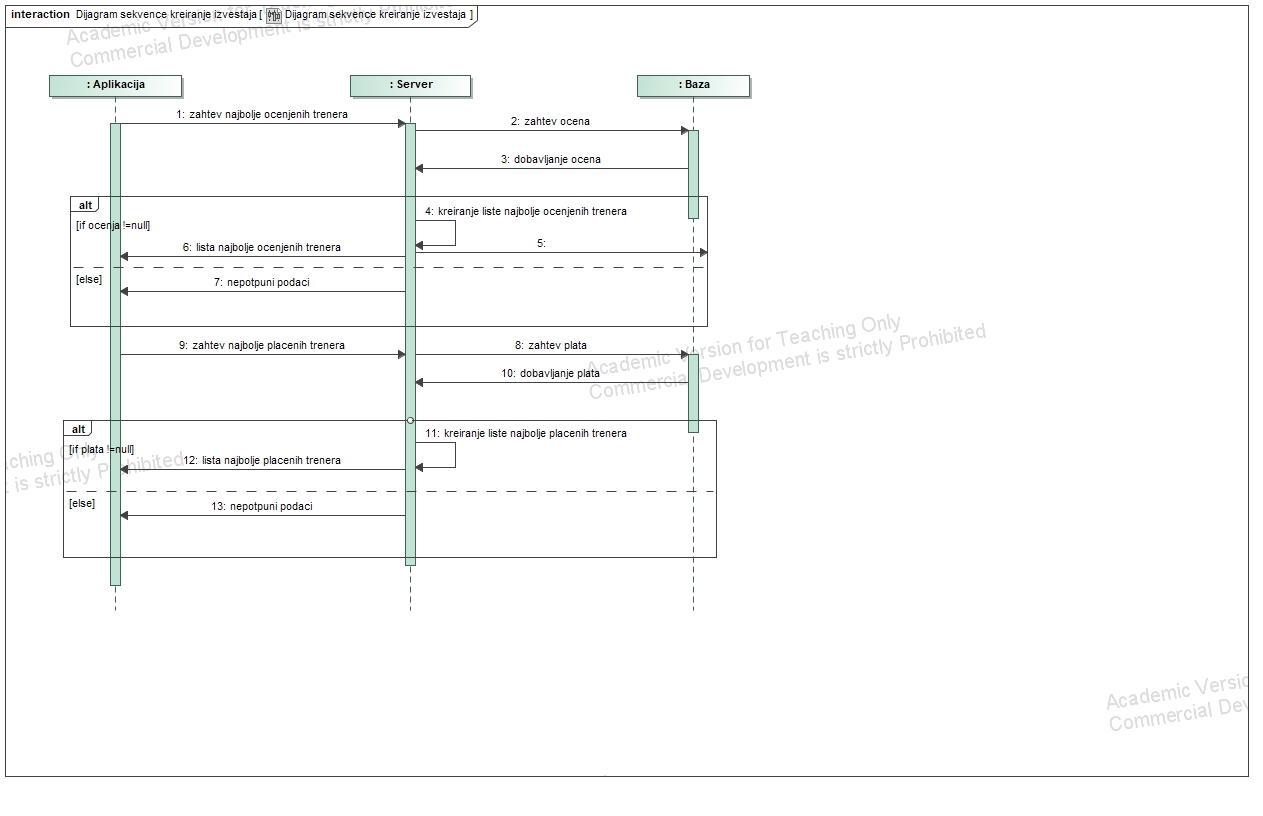
Reports for the Owner:
The platform generates reports for the owner, including earnings for a specific interval, daily, weekly, and monthly earnings.
Provides a list of top-rated trainers and those with the highest earnings.
This platform facilitates effective tracking, training management, and financial performance tracking, offering users and the owner comprehensive insights into its operations.


 https://github.com/melchisedech333/antlr4-experiments