figshare cite: Hollister, Jeffrey; Milstead, William B; Kreakie, Betty J. (2014): Expanding models of lake trophic state to predict cyanobacteria in lakes. figshare. http://dx.doi.org/10.6084/m9.figshare.946321
poster: Hollister, Jeffrey; Milstead, William B; Kreakie, Betty J. (2014): Expanding models of lake trophic state to predict cyanobacteria in lakes: A Data Mining Approach. http://f1000.com/posters/browse/summary/1096851
EPA Disclaimer
The United States Environmental Protection Agency (EPA) GitHub project code is provided on an “as is” basis and the user assumes responsibility for its use. EPA has relinquished control of the information and no longer has responsibility to protect the integrity , confidentiality, or availability of the information. Any reference to specific commercial products, processes, or services by service mark, trademark, manufacturer, or otherwise, does not constitute or imply their endorsement, recomendation or favoring by EPA. The EPA seal and logo shall not be used in any manner to imply endorsement of any commercial product or activity by EPA or the United States Government.
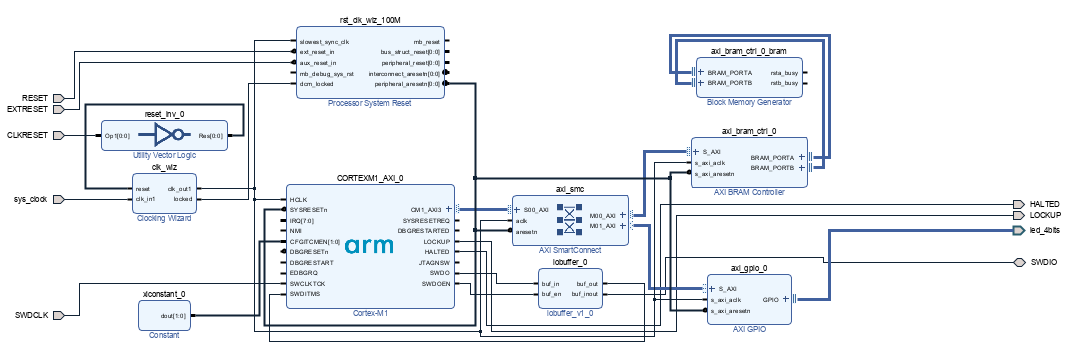
The purpose of this project is to illustrate how to create from scratch a simple SoC (System on Chip) using ARM Design Start resources. Various tutorials already exist online on this subject, but they are mostly ‘connect the dots’ guides based on pre-canned projects which require specific Vivado versions and mostly fail their objective to enable the user to create and customize on his own SoC.
Create a new Vivado project using e.g.: Arty as target board. Then, copy the contents of ‘Arm_ipi_repository’ directory included in the Cortex-M1 Design Start package into the IPs ‘directory’ and restart Vivado.
Now, go to IP Integrator/Create Block design and add the Cortex-M processor to the design. If this is not yet there, create a new project to reflect changes to IP repository applied before.
You can now add other AXI blocks, such as an AXI Interconnect and an AXI BRAM controller.
Selecting the ‘Board’ tab it is possible to add the board resources to the block design and the relevant IPs will be automatically added and connected by the tool. If, for example, board LEDs are added to the block design, Vivado will create an AXI slave GPIO block to manage them.
With the help of the connection wizard, something similar should appear:
Before building, a TOP level module must be specified. Right-click the top level design where all blocks are belonging to and select “Create HDLwrapper”. Now you can run design synthesis.
Remember to add proper constraints file to map the top signals to the correct IOs. Template files for all Digilent boards can be found here https://github.com/Digilent/digilent-xdc
The SWD debugger connection requires an INOUT buffer to bring SWD connections towards external pins. For some unknown reason, IOBUF resource is not present in the ‘Utility Buffer’ V2.2 package which comes with Vivado 2021.1. So, I crafted my own one in a separate VHDL project and packaged it with the Vivado package tools: go to Tools/Create and Package new IP/Package your Current Project. This new IP can be easily connected to the processor’s SWD signals but there’s a catch: Vivado will complain about not being able to assign INOUT signals. To work this around, use the Global synthesis as opposed to the default Out of Context one. These settings are well hidden in Vivado: you need to go to the ‘Design Runs’ tab, right click the design, and reset it. Now, a dialog will show up asking whether to use Global or Out Of Context. Other cleaner approaches might exist: figure out why the IOBUF is not there; put the inout logic in the Top wrapper created by Vivado; tweak the different units in Design Runs.
Vivado will finally complain about the SWD clock not being correctly mapped. Just add the suggested constraint in the constraints file.
Finally, remember to remap the BRAM memory in 0x0 instead of 0xC0000000 as the VTOR cannot be modified in the Cortex-M1.
Now, connect a J-Link probe to the SWD signals and check that the debugger recognizes the core. If yes, try to read/write some memory using w4 and mem32 commands.
Test also the LEDs connections via by programming the the GPIO peripheral:
w4 0x40000004 0
w4 0x40000000 0xf
If everything is fine, build the Keil project (free version limited to 32kB is more than enough) and try blinky LED application.
KenKen is an arithmetic and logic puzzle . It is a Constraint Satisfaction Problem(CSP), that the particular program solves using algorithms like BT, BT+MRV, FC, FC+MRV and MAC provided by aima-code.
The KenKen board is represented by a square n-by-n grid of cells. The grid may contain between 1 and n boxes (cages) represented by a heavily outlined perimeter. Each cage will contain in superscript: the target digit value for the cage followed by a mathematical operator.
Constraints
Each valid solution must follow the below rules:
The only numbers you may write are 1 to N for a NxN size puzzle.
A number cannot be repeated within the same row.
A number cannot be repeated within the same column.
In a one-cell cage, just write the target number in that cell.
Each “cage” (region bounded by a heavy border) contains a “target number” and an arithmetic operation. You must fill that cage with numbers that produce the target number, using only the specified arithmetic operation. Numbers may be repeated within a cage, if necessary, as long as they do not repeat within a single row or column.
For example, the text representing the above puzzle is:
6
[(0,0),(1,0)] add 11
[(0,1),(0,2)] div 2
[(0,3),(1,3)] mult 20
[(0,4),(0,5),(1,5),(2,5)] mult 6
[(1,1),(1,2)] sub 3
[(1,4),(2,4)] div 3
[(2,0),(2,1),(3,0),(3,1)] mult 240
[(2,2),(2,3)] mult 6
[(3,2),(4,2)] mult 6
[(3,3),(4,3),(4,4)] add 7
[(3,4),(3,5)] mult 30
[(4,0),(4,1)] mult 6
[(4,5),(5,5)] add 9
[(5,0),(5,1),(5,2)] add 8
[(5,3),(5,4)] div 2
Step 3: Name the key and value in your .env file as
MONGO_CONNECTION_STRING=
MONGO_URI=<Your MongoDB Connection String>
PORT=5000
JWT_SECRET=<Your JWT secret>
EMAIL_USERNAME=<Your Email>
EMAIL_PASSWORD=<Your App Password created from google account>
CLIENT_URL=http://localhost:<Frontend PORT>
STRIPE_SECRET_KEY=<Your Stripe Secret Key>
STRIPE_WEBHOOK_SECRET=<Your Stripe Webhook Secret Key>
Step 4: Add the .env in .gitignore file Step 5:
npm run dev
Step 6: Use the below API endpoints for Authentication and Base URL is http://localhost:<PORT>/api/v1/auth:
"/me" -  Get authenticated user (GET)
"/:token" - If the token is in VerifyUser collections, move the user to `users` collections (GET)
"/register" - Signup user (POST). eg., {"name": "name", "email": "example@email.com", "password":"pass123"}
"/login" - Login user (POST). eg., {"email": "example@email.com", "password":"pass123"}
Step 7: Use the below API endpoints for User and Base URL is http://localhost:<PORT>/api/v1/user:
"/getUserHostedVehicleStatus" - Get specific user hosted vehicles status list (GET)
"/update" -  Update user details (PUT)
"/forgotpassword" - User email is verified, and reset password link is sent to verified email. (POST)
"/passwordreset/:resetToken" - Check the reset token is expired and update the password. (PUT)
Step 8: Use the below API endpoints for Vehicle and Base URL is http://localhost:<PORT>/api/v1/vehicles:
"https://github.com/" -  Get the filtered vehicles (GET).
"/getAllVehicles" -  Search and Get all vehicles (GET) (Admin).
"/getUnapprovedVehicles" - Get the unapproved host vehicles and update the hostCarStatus (Admin)
"/:id" - Get specific vehicle details (GET).
"https://github.com/" - Create new vehicle (POST).
"/:id" - Update vehicle details (PUT) (Admin).
"/:id" - Delete vehicle (Delete) (Admin).
Step 9: Use the below API endpoints for Booking and Base URL is http://localhost:<PORT>/api/v1/bookings:
"https://github.com/" -  Get the booked vehicles (GET).
"https://github.com/" -  Book a vehicle (POST).
"https://github.com/" - Update the booking (PUT).
Step 10: Use the below API endpoints for Review and Base URL is http://localhost:<PORT>/api/v1/reviews:
"https://github.com/" -  Get the reviews of specific user (GET).
"https://github.com/" -  Post a reatings and comment for the booked vehicle (POST).
Step 10: Use the below API endpoints for Payment and Base URL is http://localhost:<PORT>/api/v1/payment:
"/create-checkout-session/:id" - Proceed with the vehicle rental by initiating the checkout session (POST).
Translations in languages other than English are machine translated and are not yet accurate. No errors have been fixed yet as of March 21st 2021. Please report translation errors here. Make sure to backup your correction with sources and guide me, as I don’t know languages other than English well (I plan on getting a translator eventually) please cite wiktionary and other sources in your report. Failing to do so will result in a rejection of the correction being published.
Note: due to limitations with GitHub’s interpretation of markdown (and pretty much every other web-based interpretation of markdown) clicking these links will redirect you to a separate file on a separate page that isn’t the intended page. You will be redirected to the .github folder of this project, where the README translations are hosted.
Translations are currently done with Bing translate and DeepL. Support for Google Translate translations is coming to a close due to privacy concerns.
Try it out! The sponsor button is right up next to the watch/unwatch button.
Version history
Version history currently unavailable
No other versions listed
Software status
All of my works are free some restrictions. DRM (Digital Restrictions Management) is not present in any of my works.
This sticker is supported by the Free Software Foundation. I never intend to include DRM in my works.
I am using the abbreviation “Digital Restrictions Management” instead of the more known “Digital Rights Management” as the common way of addressing it is false, there are no rights with DRM. The spelling “Digital Restrictions Management” is more accurate, and is supported by Richard M. Stallman (RMS) and the Free Software Foundation (FSF)
This section is used to raise awareness for the problems with DRM, and also to protest it. DRM is defective by design and is a major threat to all computer users and software freedom.
This application is a starter for the creation of bots for Facebook Messenger and WorkChat (Workplace) for demonstration and education purposes. Its configuration is robust and scalable and can be used in a productive environment. Use this application to learn, experiment, retouch and practice the different options offered by the Facebook API.
For more information about the Facebook API you can read the documentation that the Messenger team prepared.
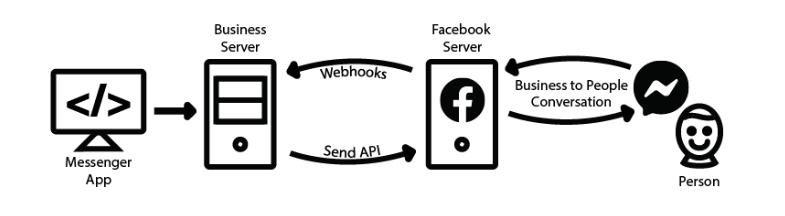
Messaging bots use a web server to process the messages they receive or to find out which messages to send. It is also necessary for the bot to be authenticated to talk to the web server and for the bot to be approved by Facebook to talk to the public.
When a person sends a message to a company in Messenger, the following happens, as long as the page uses an app to partially or completely automate the conversations. The Facebook server sends webhooks to the URL of the company’s server where the message app is hosted. That app can then reply to the person in Messenger using the Send API. This allows developers to create guided conversations for people to perform an automated process or develop an app that serves as a link between your agents and your company’s Messenger presence.
🤖 Live Demo
You can try some functions of the bot by entering here.
And you can try other kind of messages from the server documentation, don’t forget to get your ID from the chat bot persistent menu.
🙌 Let’s start
Before starting to work on our bot, we must have installed some tools in our computer that will facilitate us to work locally and be able to test some functionalities that the starter has available, and I will take for granted some basic concepts so as not to go into detail and extend the documentation.
When we have the basic requirements, we clone the repository, go to the project folder and install its dependencies.
npm install
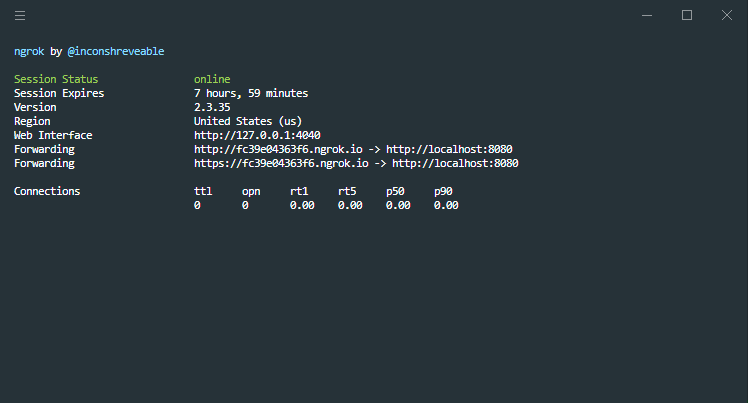
We download the latest version of Ngrok compatible with our operating system, and decompress it in the server root.
⚙ Configurations
This application uses the config dependency to facilitate the configuration of environment variables, which makes it scalable and robust when deploying the application in different environments.
In the path ./config you will find a file called development.json which contains the settings for a local environment, while the file custom-environment-variables.json gets the key values of the environment variables displayed on the server.
Basically the file works as an object that is exported and can be consumed by invoking it in the file that requires consuming the loaded information.
If you need to add another type of data to consume, like the connection to a database, the url of some microservice, etc. you just have to add it to both files keeping the scheme.
You may find that you can’t configure some values for now, but that’s not a problem, when using the nodemon dependency, the server is in a watching state that at the slightest change of code, the server will run again.
See all available configuration properties in detail.
Server
url: It is the url of the server deployed in some environment, in the case of running it locally, you enter the url with ssl provided by ngrok.
Type: String
Default:
port: Is the port in which the application is deployed.
Type: Number
Default: 8080
context: It is the context from which the server’s api can be accessed, this way the routes in the main path of the application are not exposed.
Type: String
Default: /api
origins: The origins serve so that the application can only be consumed by reliable urls and avoid any kind of unwanted and malicious requests. You should write the urls separated with comma.
showLogInterceptor: Enables the display of the request interceptors in the logs.
Type: Boolean
Default: false
Params
fbApiVersion: Is the api version of facebook
Type: String
Default: v8.0
verifyToken: It is the verification token required by the application when invoked by facebook, this token is private and should not be exposed.
Type: String
Default: my_awesome_bot_verify_token
appSecret: It is the secret key to the app, it is required if you are going to use the security settings for the requests.
Type: String
Default:
accessToken: The access token is the alphanumeric hash that is generated when you create the application on Fecebook or Workplace.
Type: String
Default:
subscribedFields: Are the permissions required to subscribe to the application in order to interact with the user. These permissions are only required for Facebook bots and must be typed separately by comma.
userFields: It is a comma-separated list to obtain the user’s information.Documentation
Type: String
Default: id,name,first_name,last_name,email
secrets: Here you can enter any value you want to hide in the server logs of the bot, for example the id of the sender or the id of the sender. The values to hide must be written separated by comma.
Type: String
Default:
requireProof: Enables or disables the use of appsecret_proof and appsecret_time for security requests, it is required to have configured the secret key of the app to work.
Type: Boolean
Default: false
services
fbApiUrl: It is the url of the Graph API of Feacebook
Type: String
Default: https://graph.facebook.com
swagger
enabled: Enable or disable the documentation of the bot’s server endpoints with swagger.
Type: Boolean
Default: true
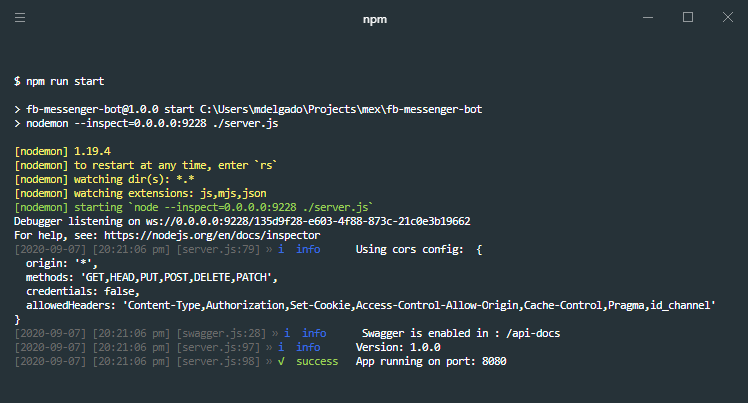
💻 Run server
We start the bot’s server.
npm run start
Once the server is started, we must start ngrok to create the connection tunnel between the bot’s local server and the Facebook server.
./ngrok http 8080
Windows
./ngrok.exe http 8080
To see other tunnel configurations, you can check the documentation
📚 Swagger
The project has a Swagger that has documented the most important endpoints of the project, and facilitates the configuration of the fields for the bot, such as the get started button, persistent menu and the greeting.
This documentation can be enabled or disabled from the configuration files.
Default: http://localhost:8080/api-docs
URL Scheme
<http|https>://<server_url><:port>/api-docs
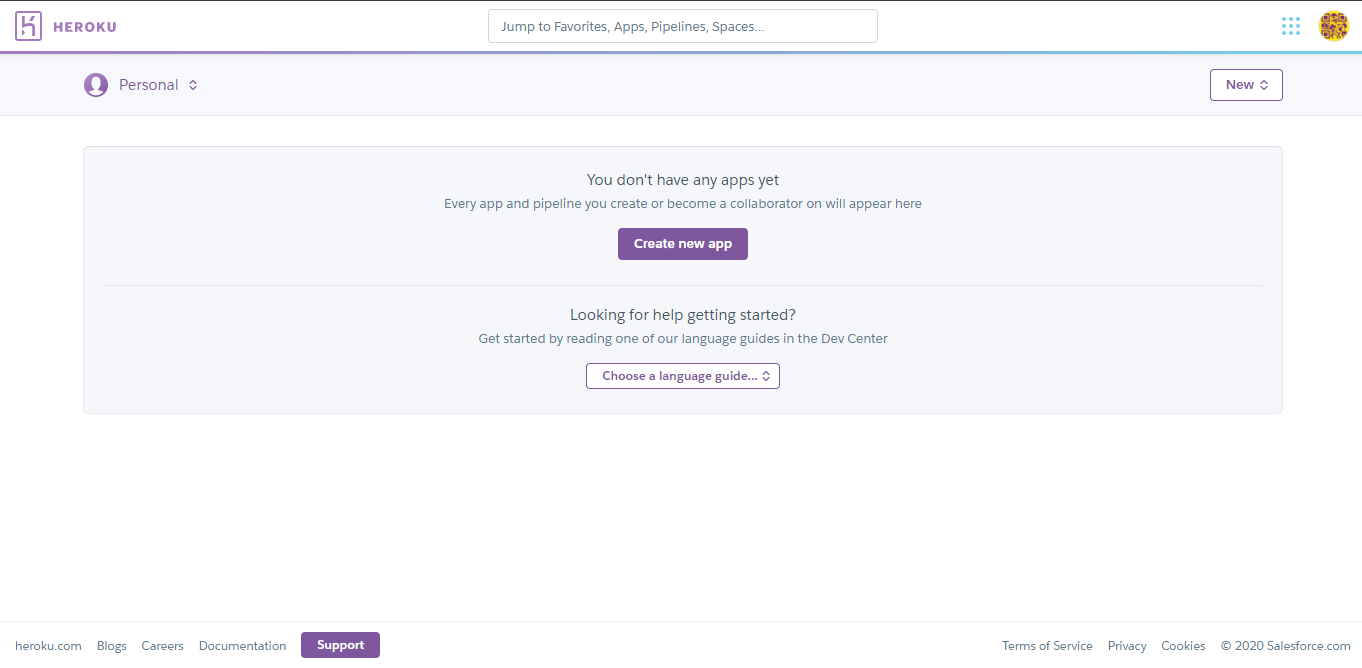
🖥️ Deploy server in heroku (free)
You can run the bot server in a productive environment on any node server, in this case I will explain the steps to raise the server on the platform Heroku, which has a free version to deploy node servers, you can also hire a paid service which gives you more features.
We will need a file called Procfile, which is the one Heroku will use to initialize the server once deployed.
Its content is:
web: npm start
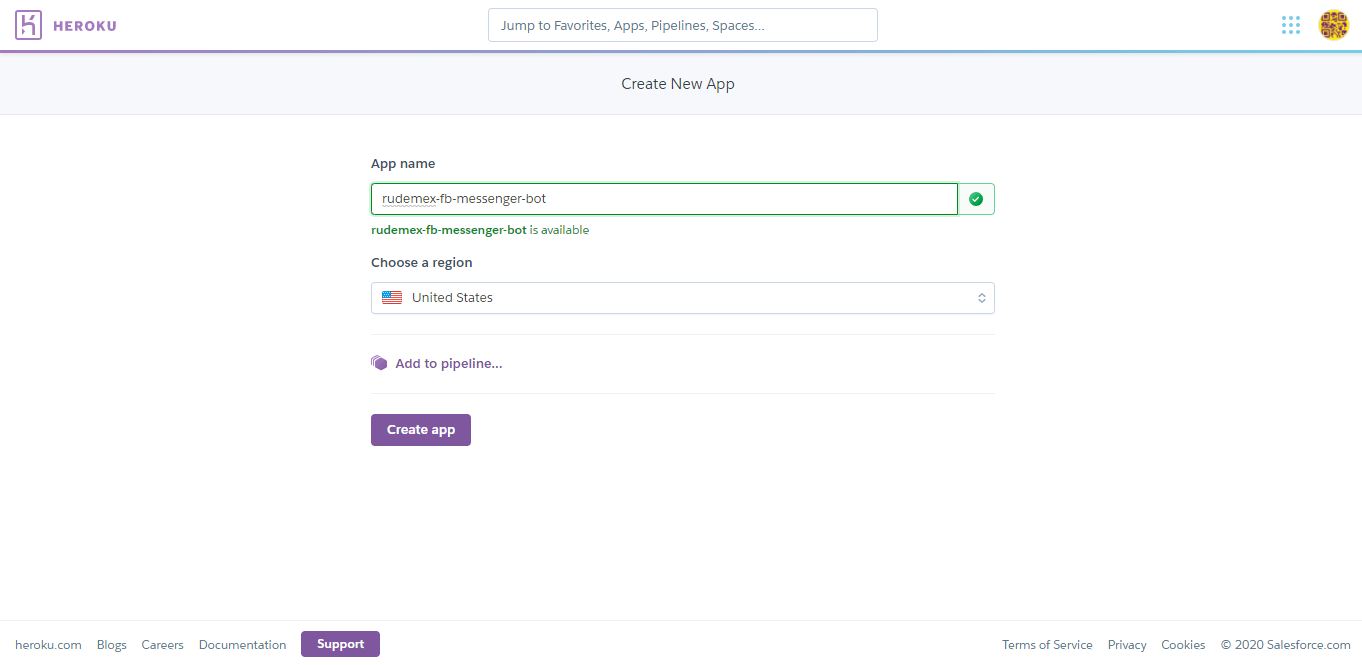
After logging into Heroku, click on Create new app
We write the name of our app, and select a region, and then click on Create App.
💬 note: Remember to save the name of the app, as you will need it later to replace the value of <app_name> with the name of the app.
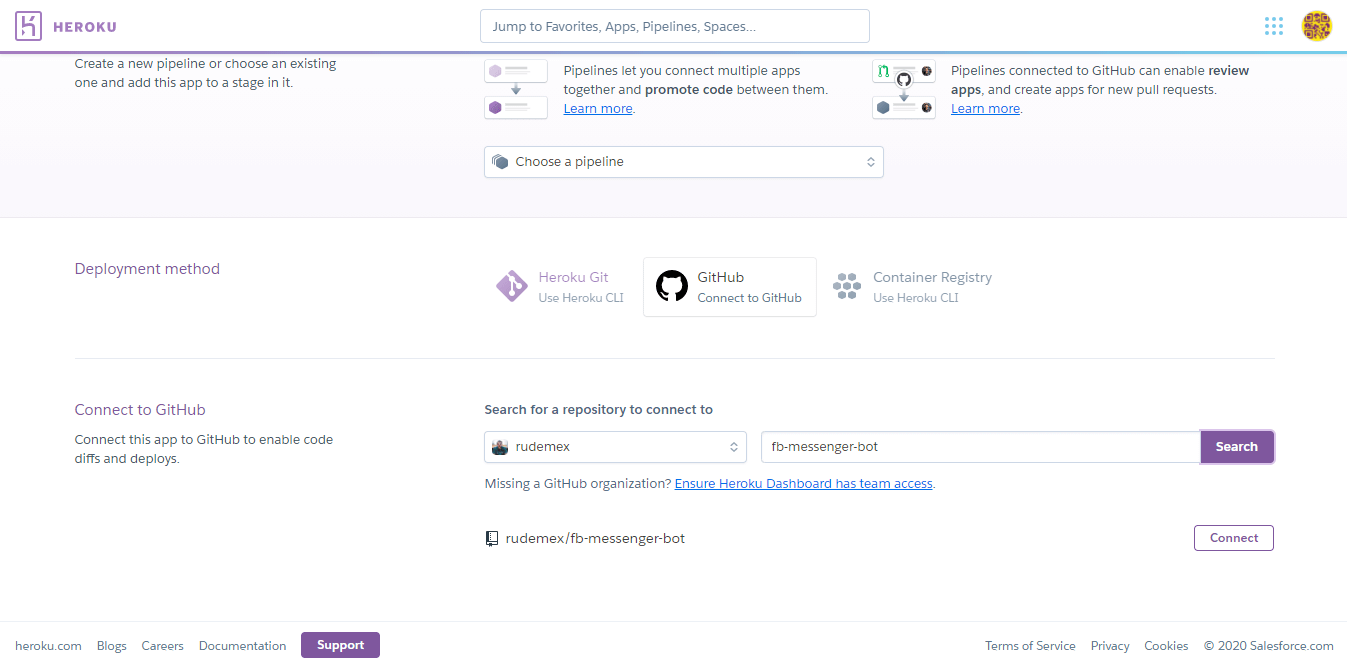
Heroku gives you several options to deploy your server. You can do it with Heroku CLI by following the steps in the documentation, or you can deploy it directly from Github, which is much easier.
For existing repositories, simply add the heroku remote
heroku git:remote -a <app_name>
Deployment method: GitHub
We click on the connect to GitHub button, if you’ve never connected Heroku to Github, a window will open to authorize the connection so you can continue with the step of entering the name of the repository and searching it in your GitHub account, and once you find it, we click on the Connect button.
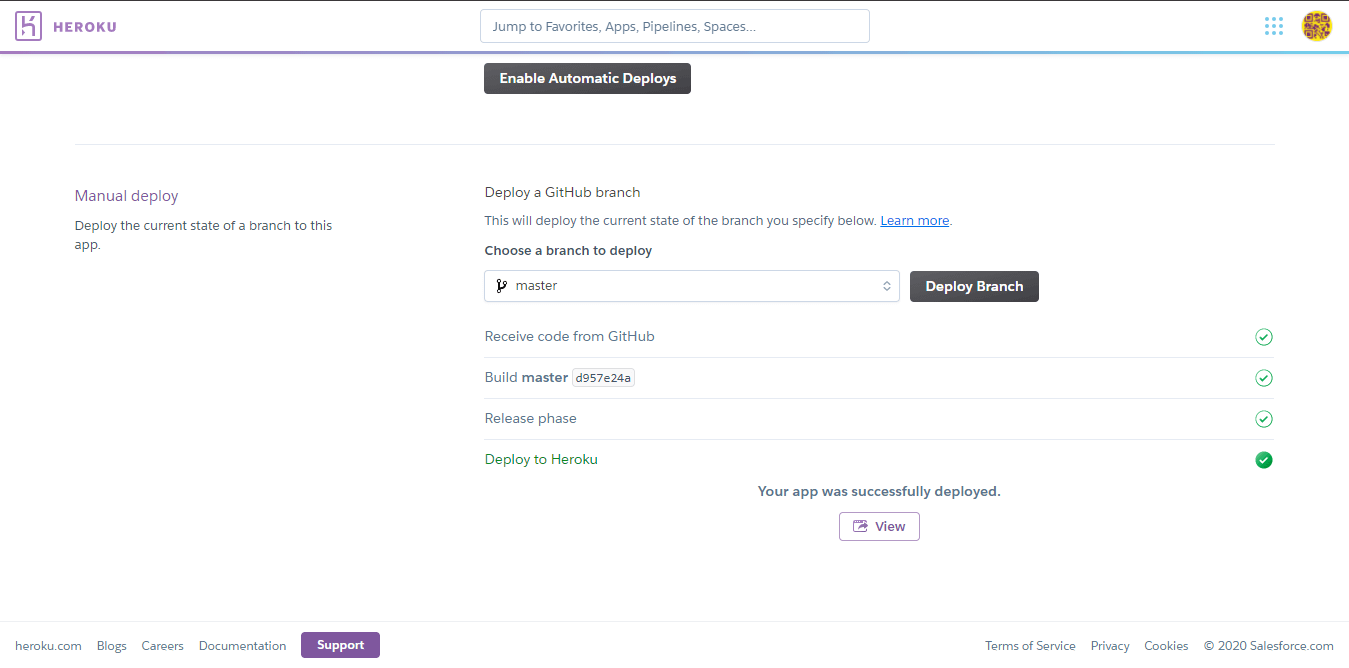
Then we select the branch we want to deploy, and click on Deploy Branch, and it will start running the deployment, downloading the code from the repository, installing the dependencies, etc.
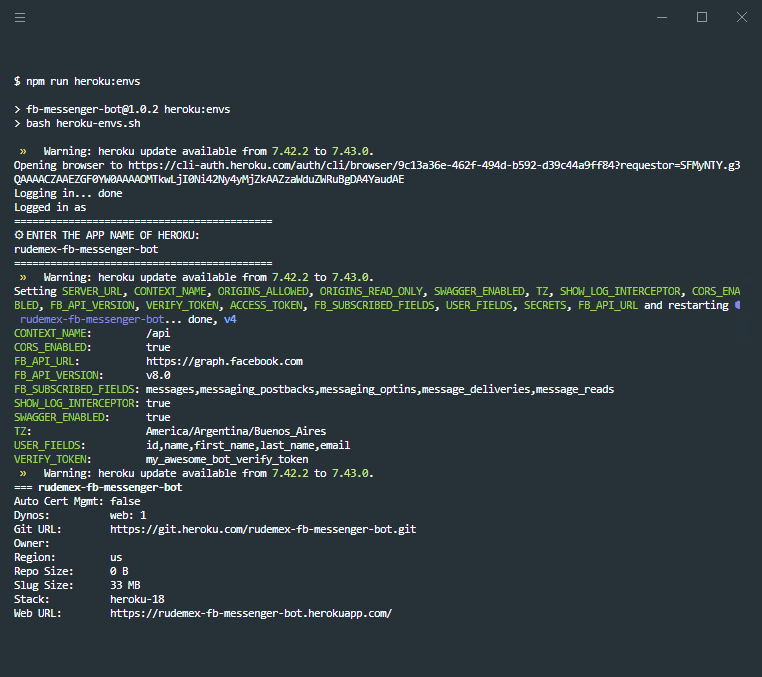
Now we have to configure the environment variables of the server, although we can do it manually from Settings > Config Vars, there is a bash script prepared that will raise the environment variables of our .env file that is located in the ./variables folder.
npm run heroku:envs
or
bash heroku-envs.sh
📱 Setup the Facebook App
The time has come to create and configure our app on Facebook.
With the local server and the connection tunnel initialized, we will configure the app, and with the information that it will give us we will finish configuring the data that we are missing in the bot’s server.
💬 Remember that the bot’s server is in watch mode, and any changes made will be re-initialized and take the changes made.
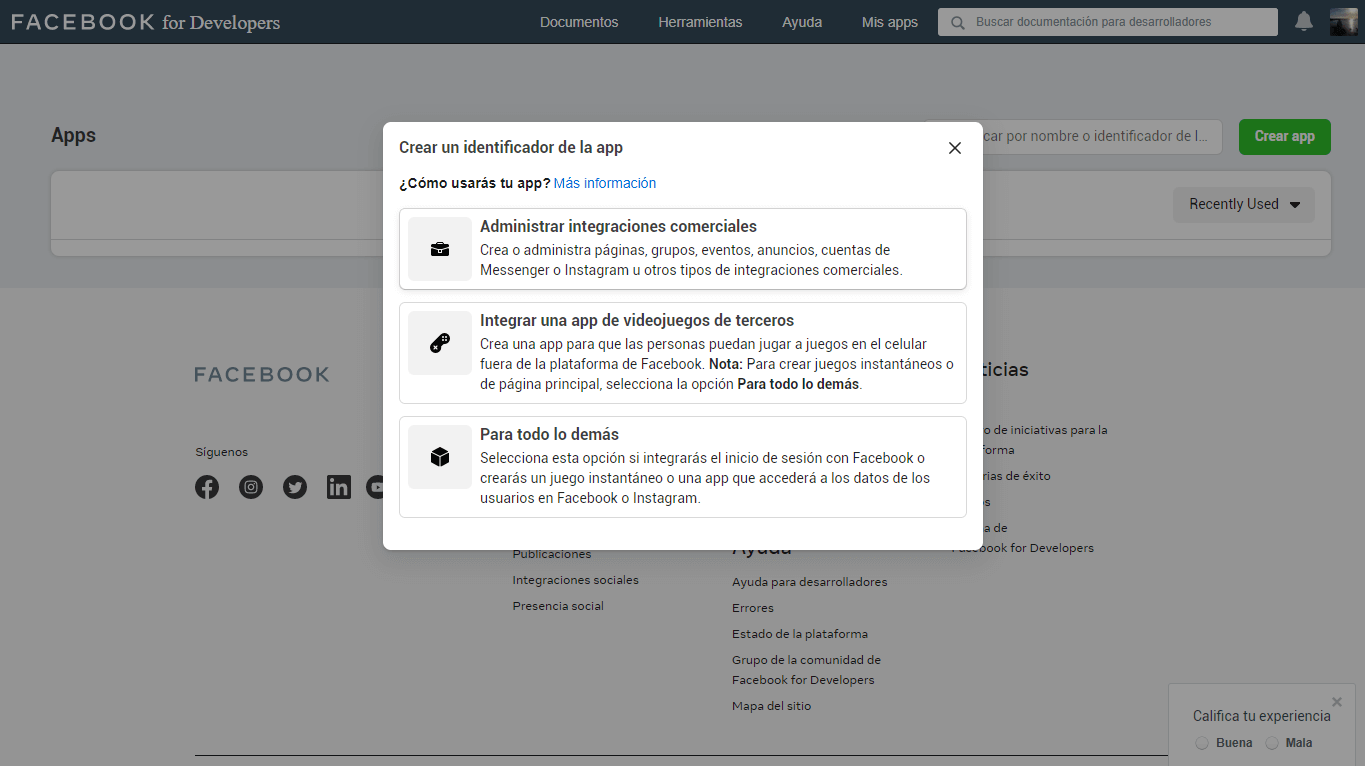
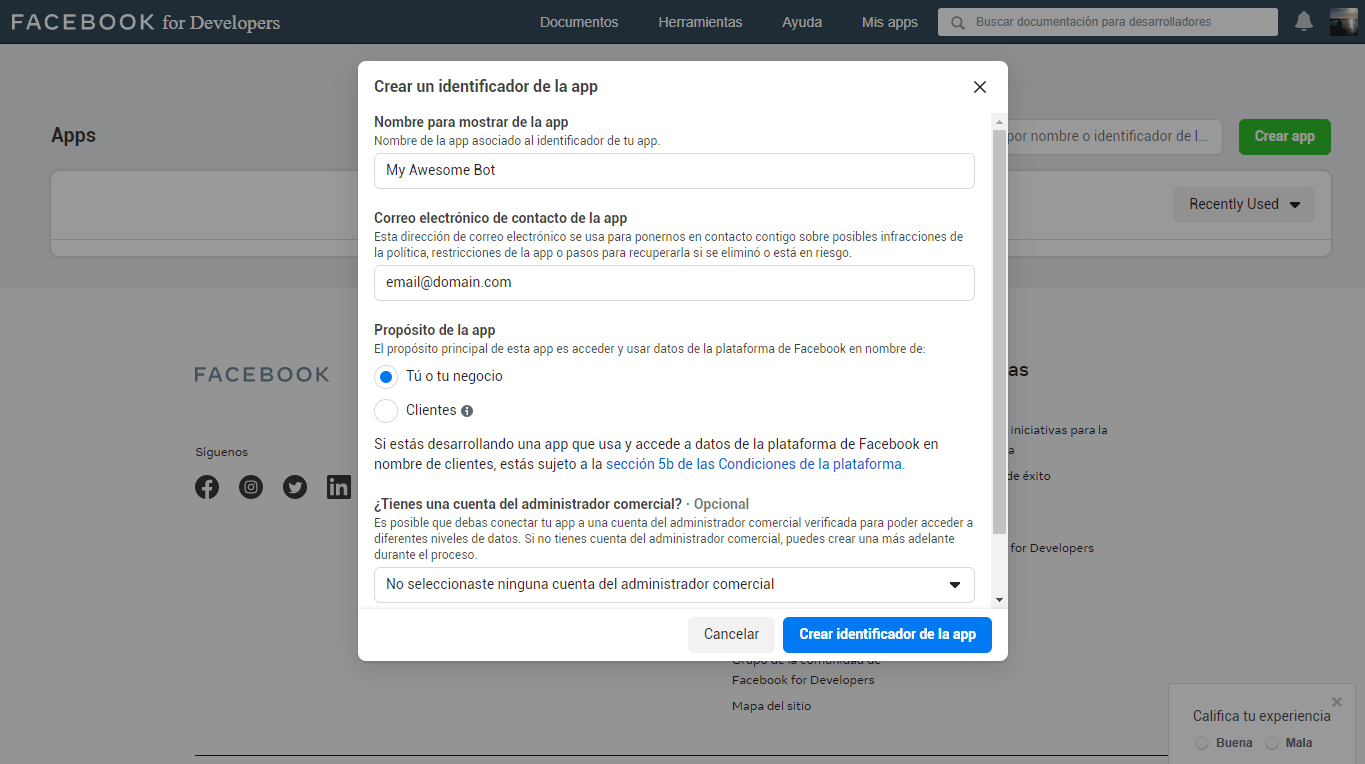
Enter Facebook Developers and click on create app, it will open a modal to select the type of application, in our case we will create an application type “Manage business integrations“.
Now we will have to make some basic settings for the application.
We assign a name of the app to identify it, we put a contact email, we select the purpose of the app, in this case is for us, and if we have a commercial administrator account, we select one from the list, if you do not have such an account, you can create it later.
Once the information is completed, we click on Create App identifier
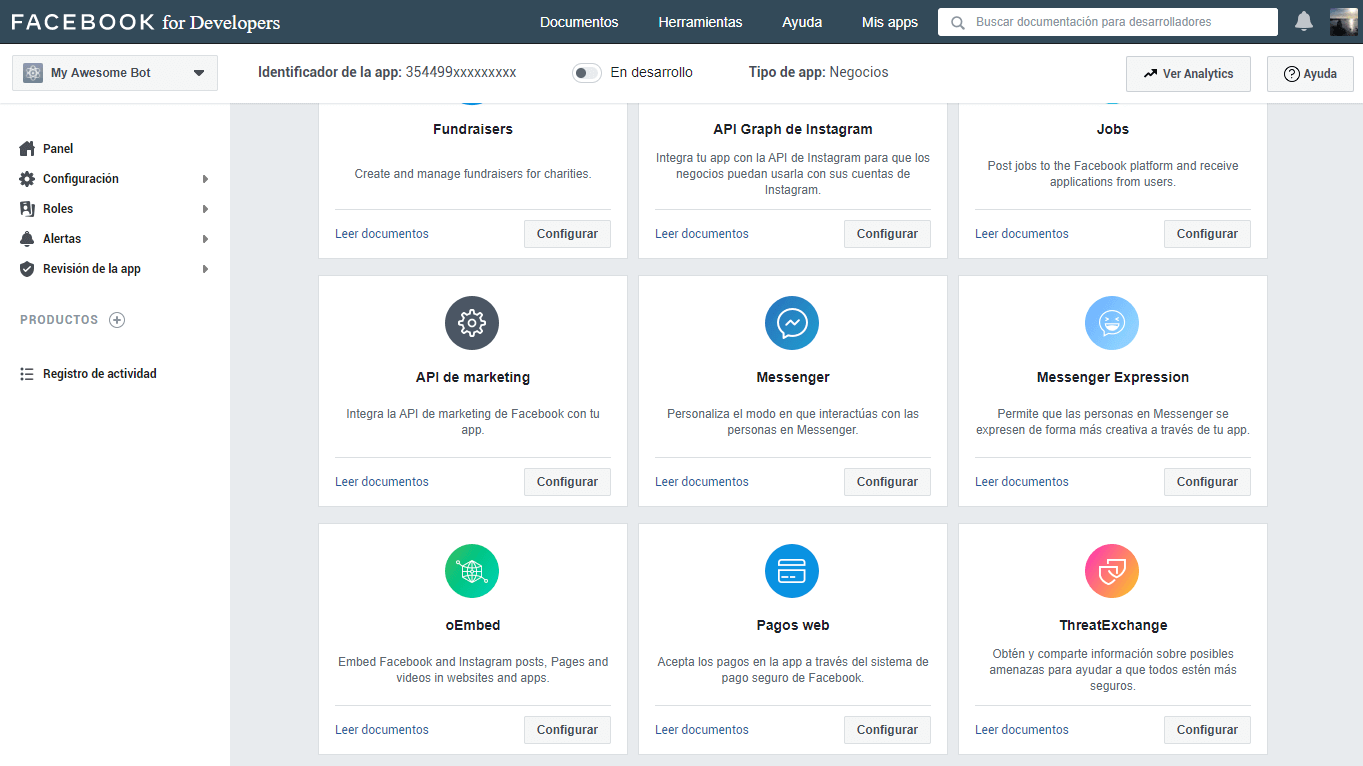
Then we look for Messenger in the app’s product list, and hit the configure button.
Now we are going to make the two necessary and essential configurations to be able to connect Facebook with our bot server.
Access tokens
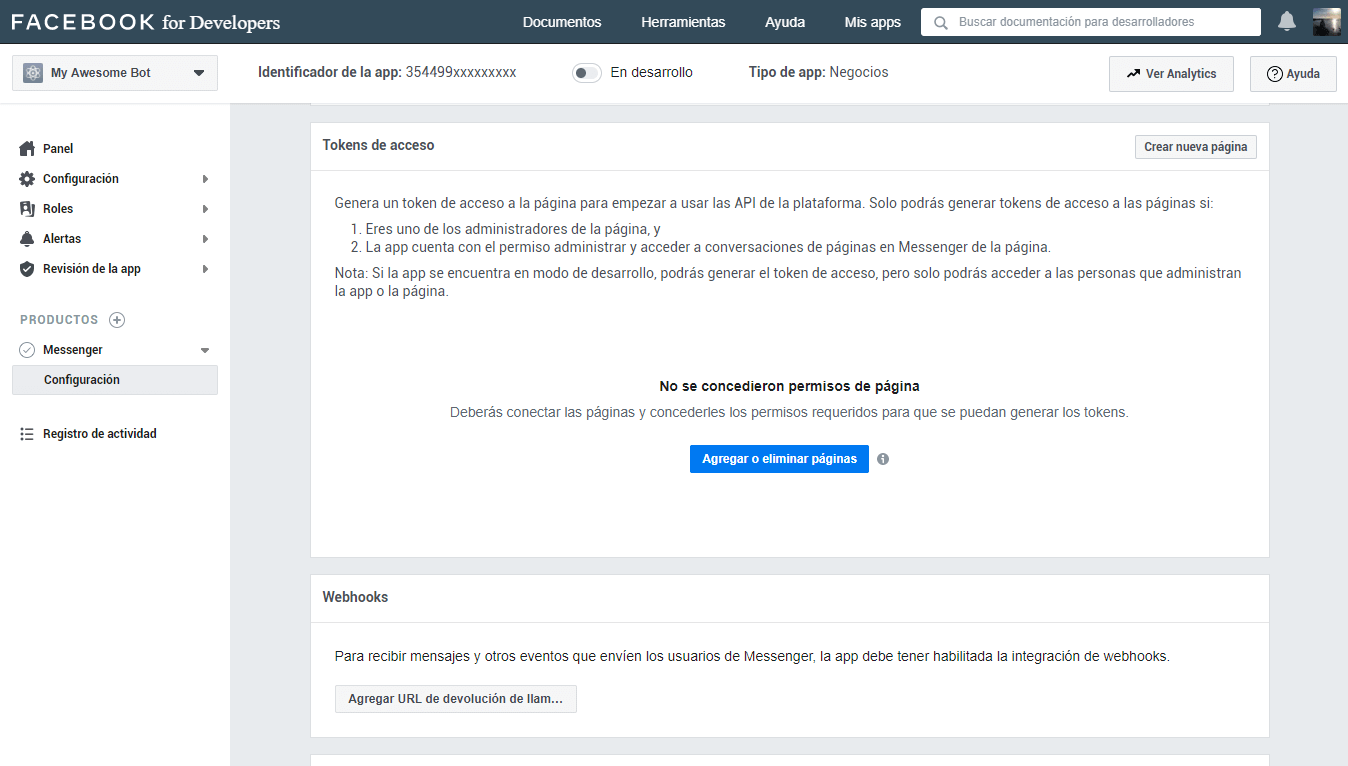
In this part of the configuration, we will be able to manage which page or pages of facebook will have the bot available.
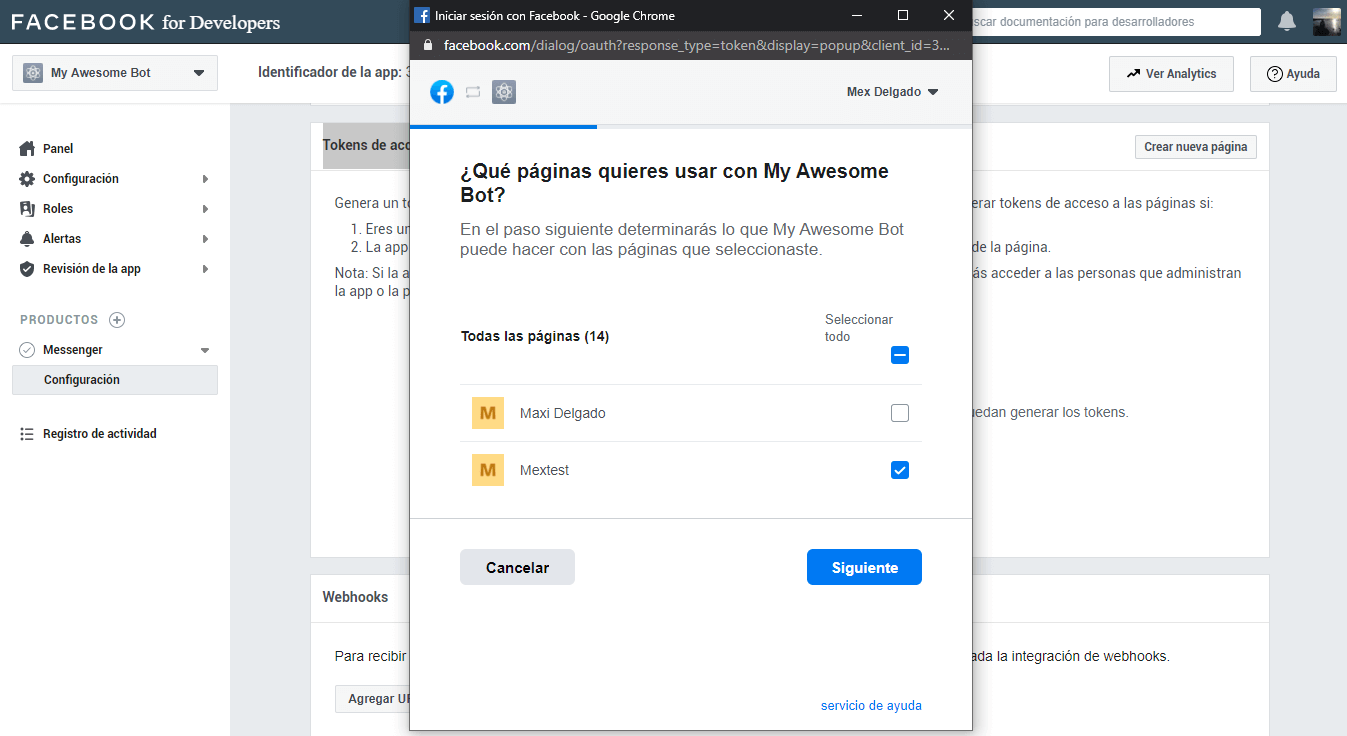
We click on Add or Remove pages, and select the page.
Once the page is linked to the app, we have to generate the token by clicking on the button Generate Token, and a window will open where you give us some instructions about the token.
We must check accept in order to view the full hash, then copy it and place it in the configuration of our server, if it is for development it is put in the json of ./config/development.json in the key of accessToken, and if it is for a productive environment, we must put it in the envs file in ./variables.
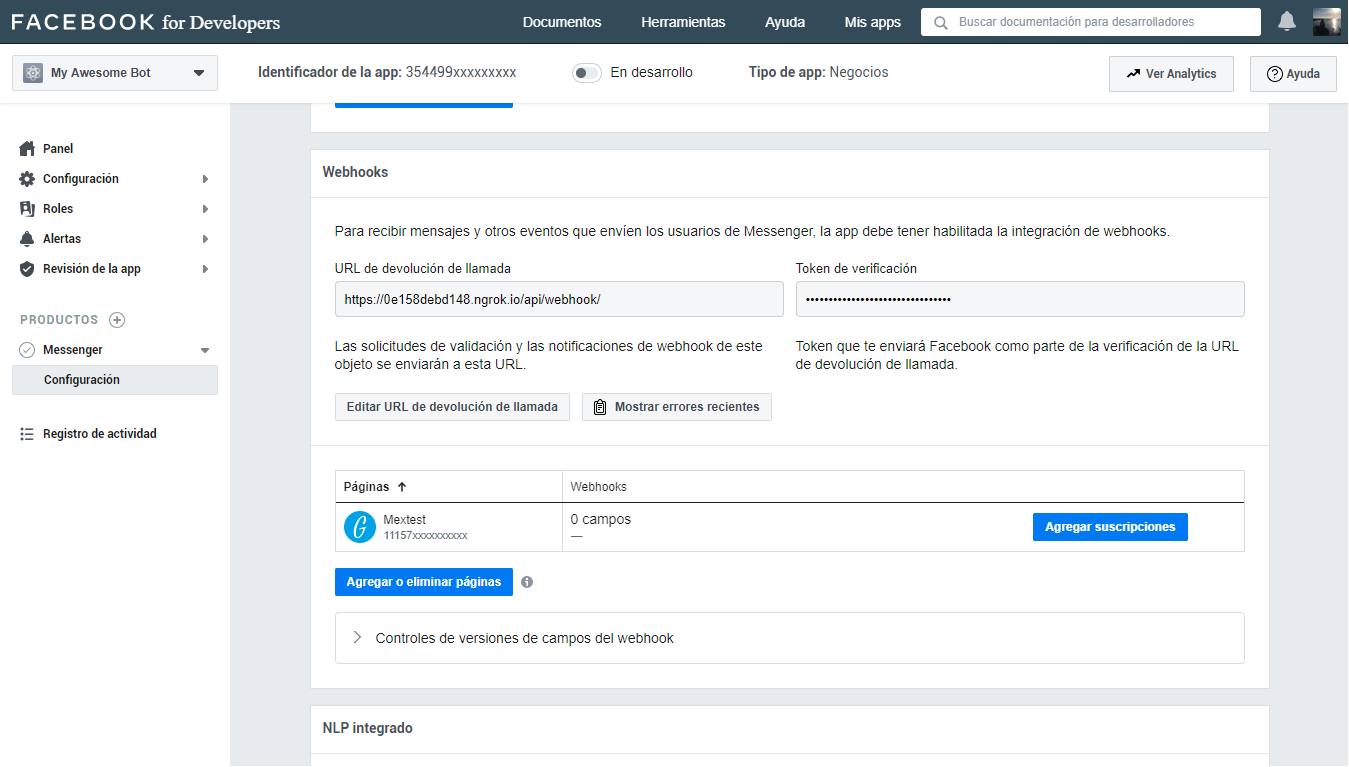
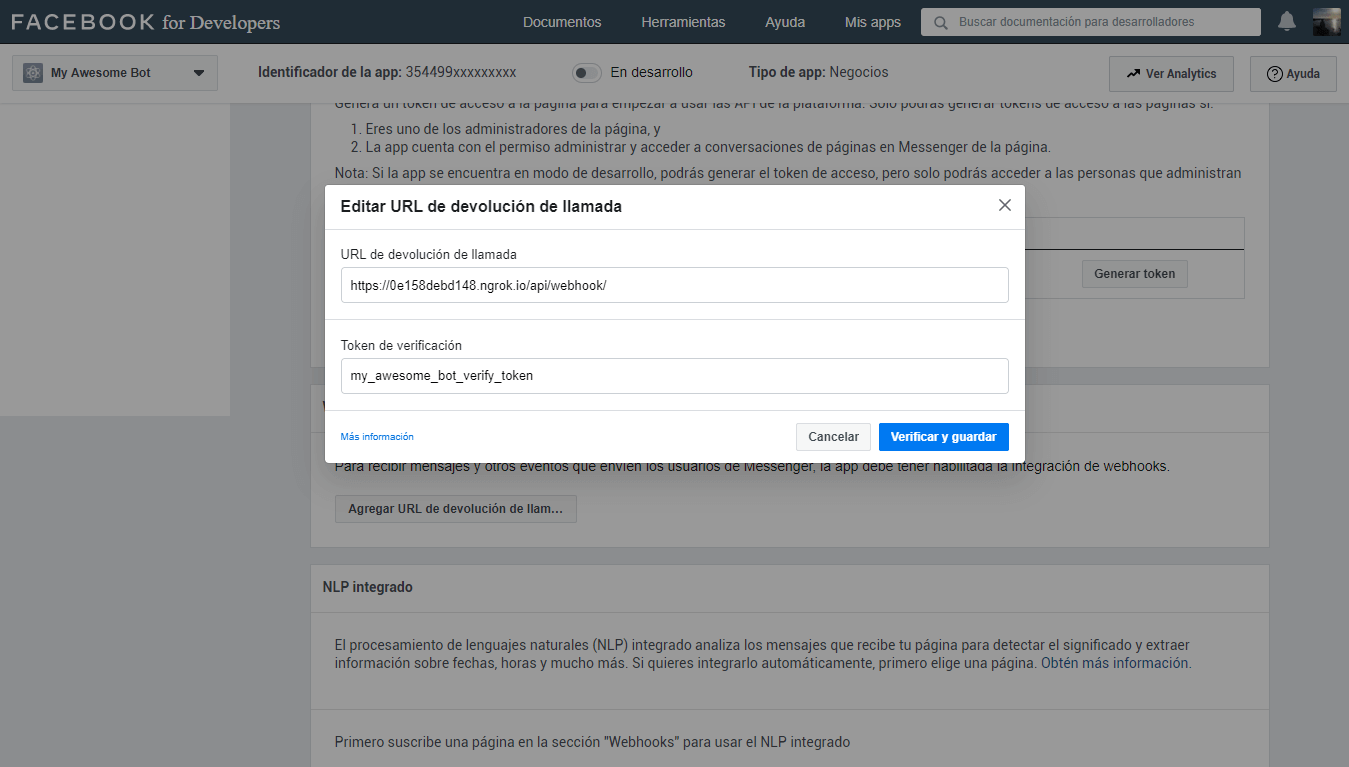
Now we have to configure the connection between Facebook and our server through Webhook, for this, you must have at hand the verifyToken that you configured and the bot’s server url, in this case, we will use the one provided by ngrok with ssl.
https://<id_tunnel>.ngrok.io/api/webhook/
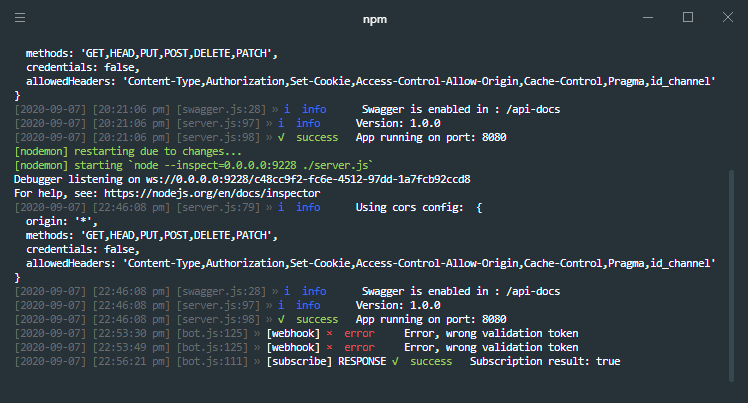
Then click on Verify and Save, and if everything goes well, in the server terminal you should see the successful subscription message.
If the url of the webhook by ngrok changes, or you want to configure the url of the productive server, you can do it by clicking on the button Edit Callback URL and perform again the previous steps.
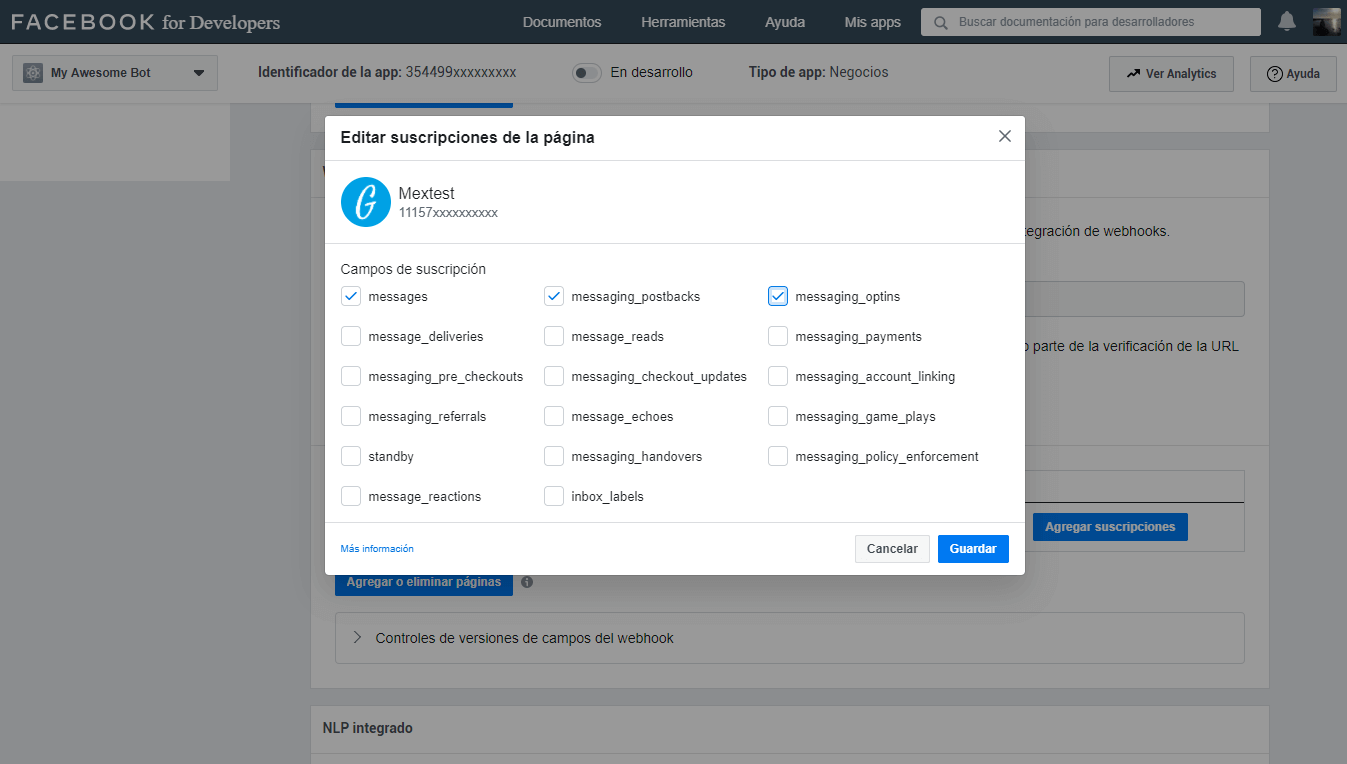
Add subscriptions
Now we have to add the subscriptions that will allow the bot to have certain permissions to perform the actions we need.
For that we click on the button Add subscriptions
Select from the list the basic permissions and click on Save
Then we add each permission to the configuration files separated by a comma.
These are the last settings to be made and are optional.
It consists in executing a curl script in the terminal to implement some options, don’t forget to put the access token to make it work.
💬 Note: You can run these scripts from Swagger, but you must adjust the files that are inside the ./templates/configs folder
We have finished configuring the app so that Facebook connects to the bot’s server, now we have to test it, to do this we can enter the chat page and perform a test to verify that everything is working properly.
📡 How to share your bot
Add a chat button to your webpage, go here to learn how to add a chat button your page.
🔗 Create a shortlink
You can use page username to have someone start a chat.
https://m.me/<PAGE_USERNAME>
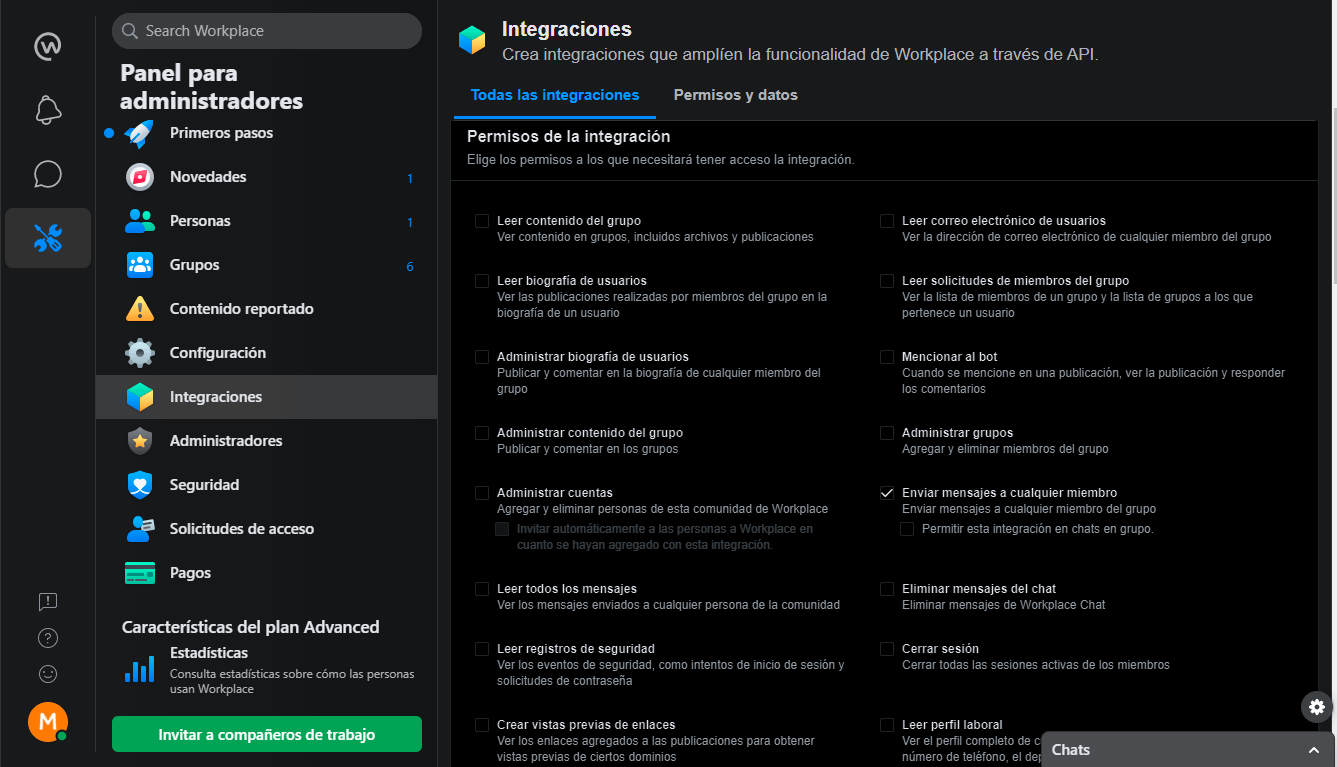
📱 Setup the Workplace App
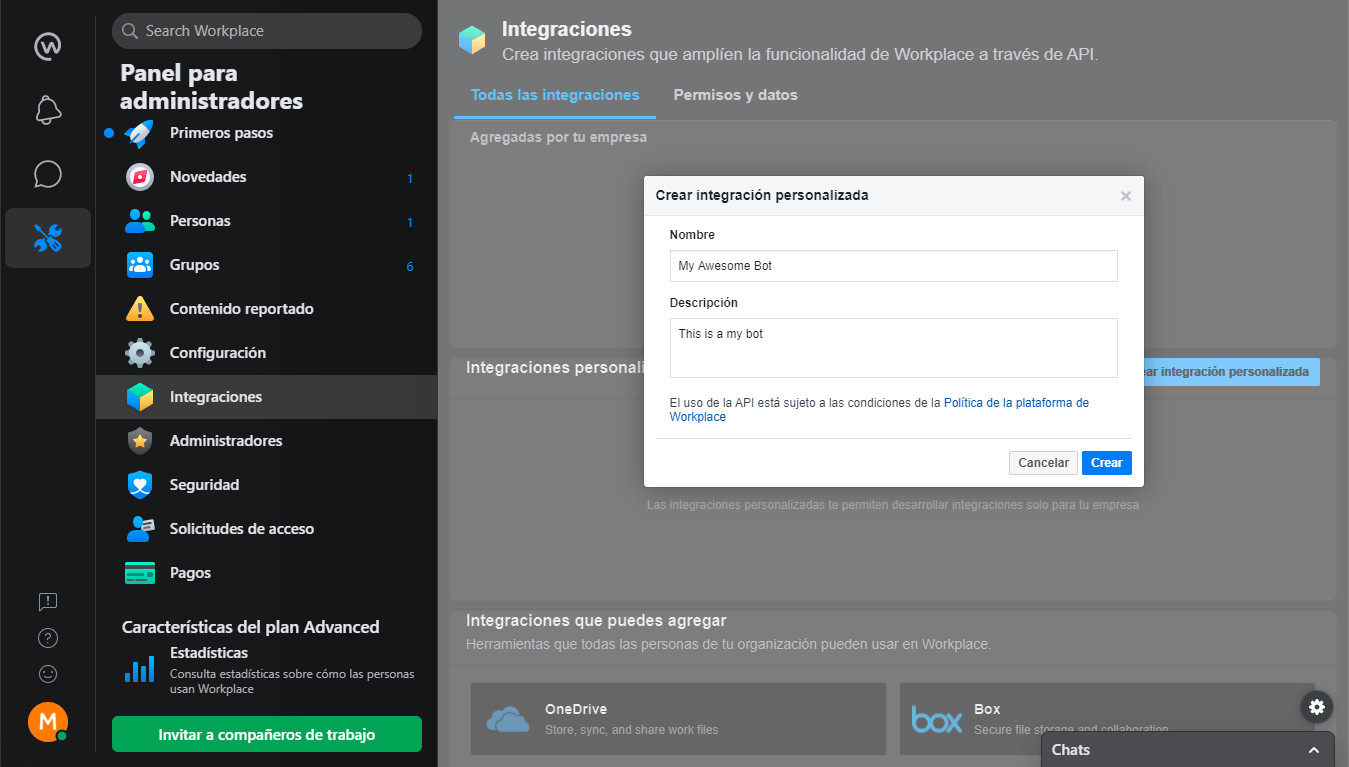
The configuration of the app for Workplace is quite similar to that of Facebook, it is required to have the Workplace paid account in order to enable custom integrations.
Go to the Administrator Panel, and click on the Integrations button, and in the Custom integrations section click on the Create custom integration button.
It will open a modal where we must write the name of the application and a description, then click on Create.
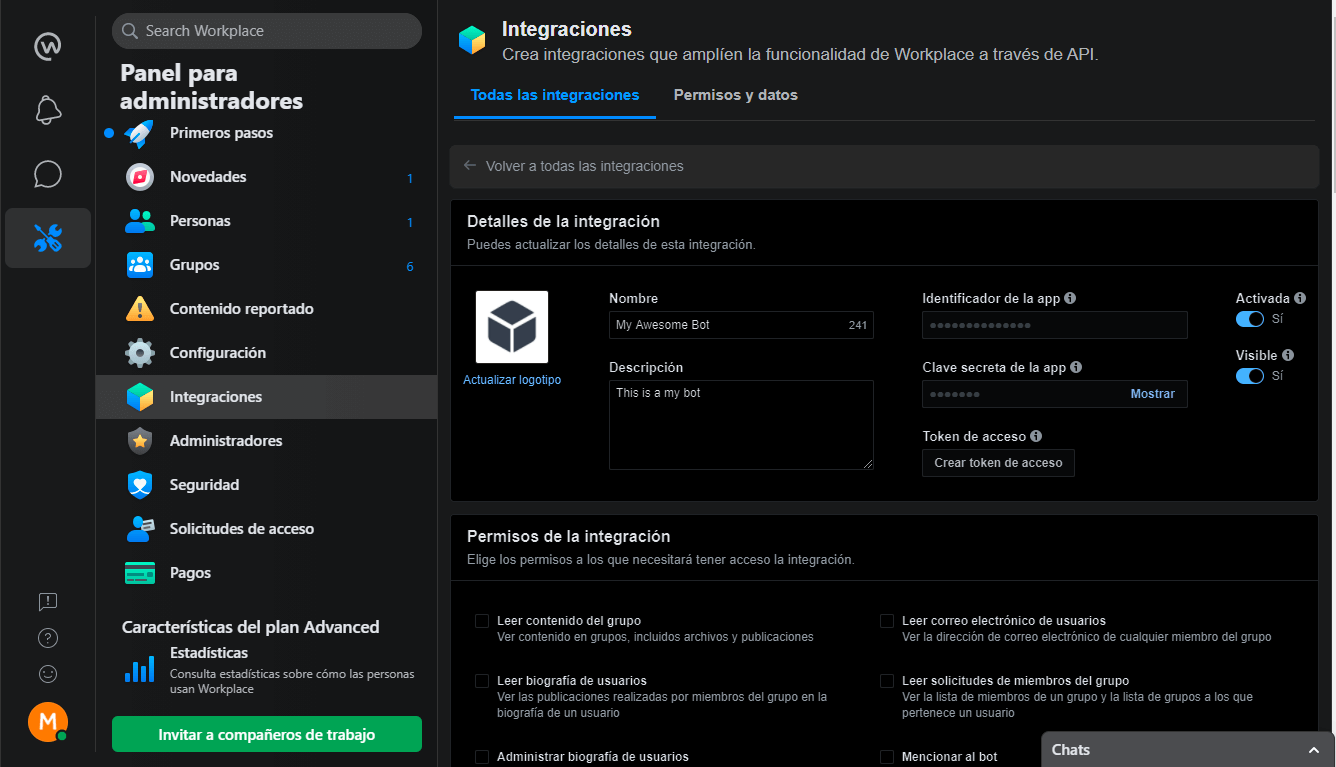
Once the application is created, it takes us to the configuration page of the application.
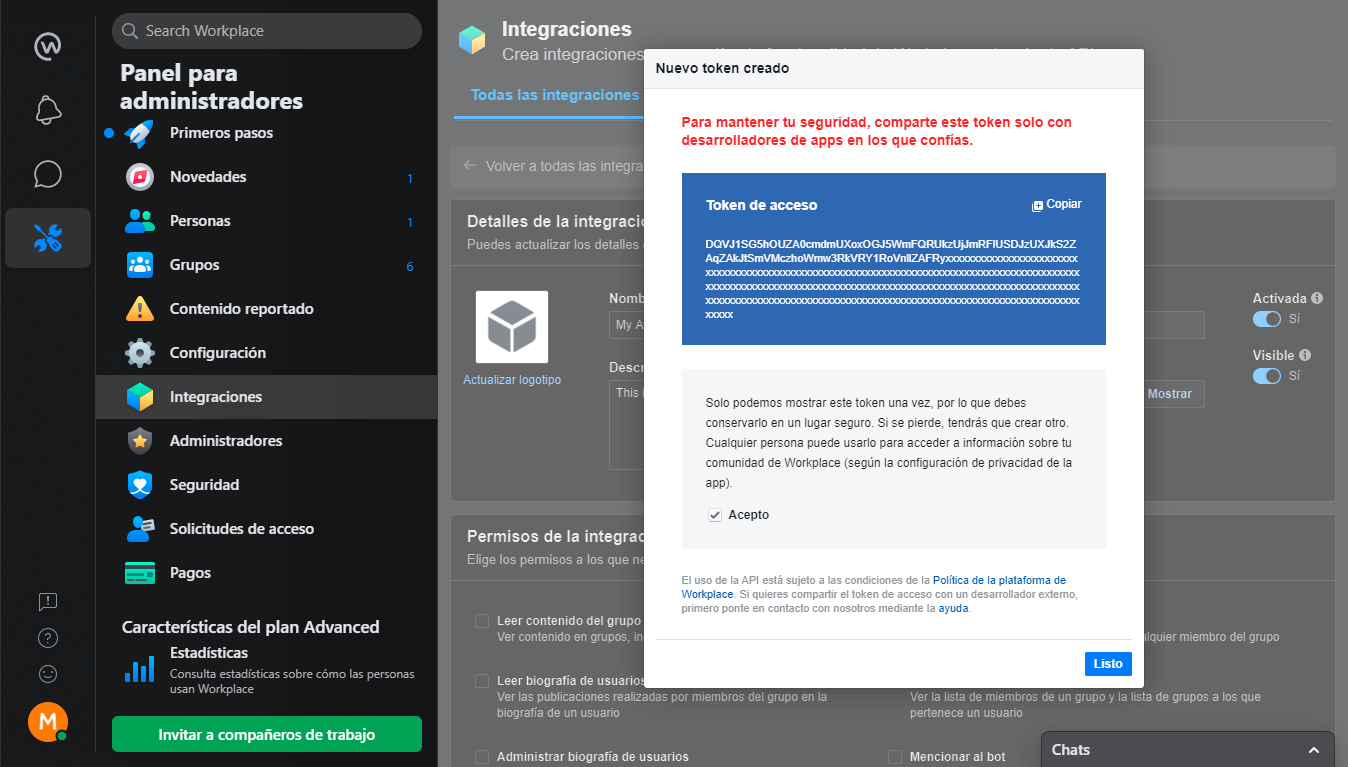
Access token
Now we are going to generate an access token and then configure it in our config, as mentioned in the configuration of the Facebook app.
Now let’s select the permissions for our bot.
Permissions
In our case we are interested in the option of Sending a message to any member.
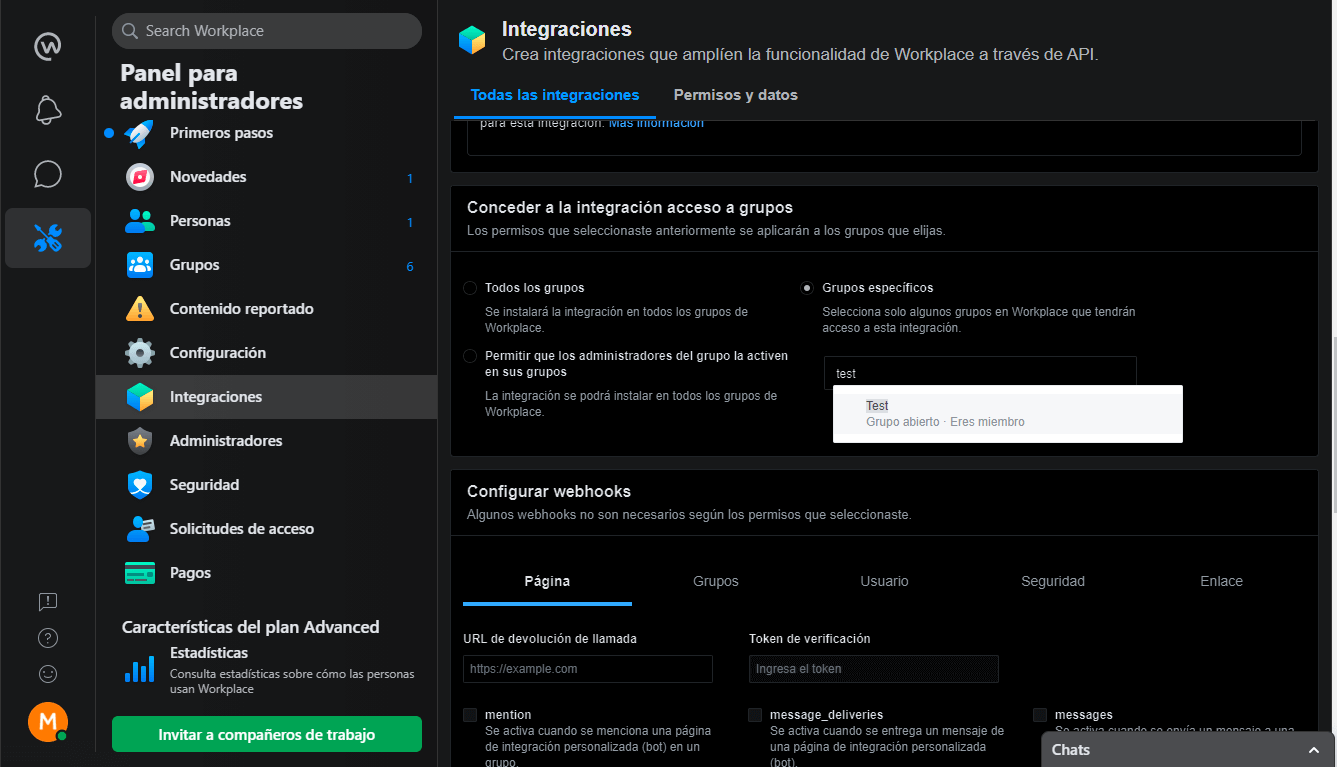
Now we are going to grant the integration access to groups, in this case it is going to be to a specific group.
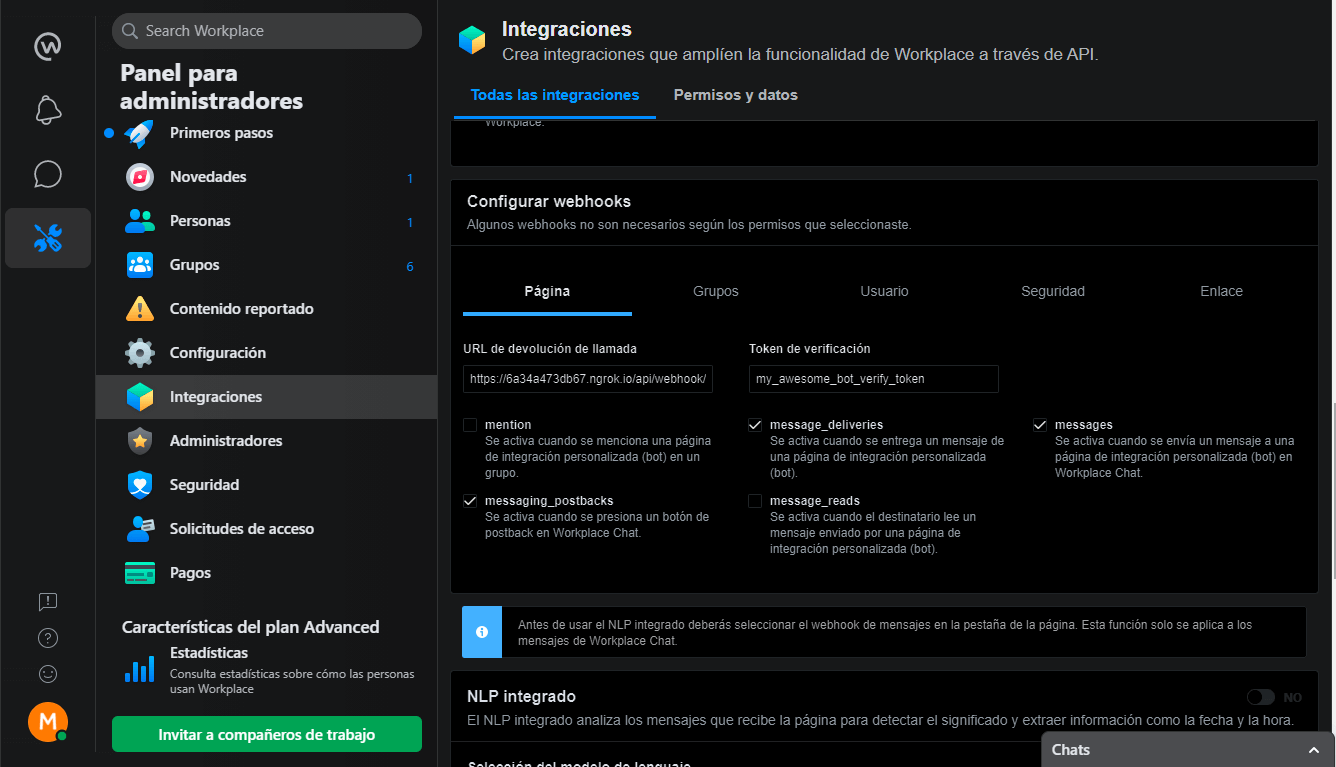
And finally, we have to configure the Webhook and the verify token and select the subscriptions we need, as we did with the Facebook app.
💬 Note: depending on the webhook configuration you select in the tabs, the subscriptions will change.
🙌 Finally we click on the save button.
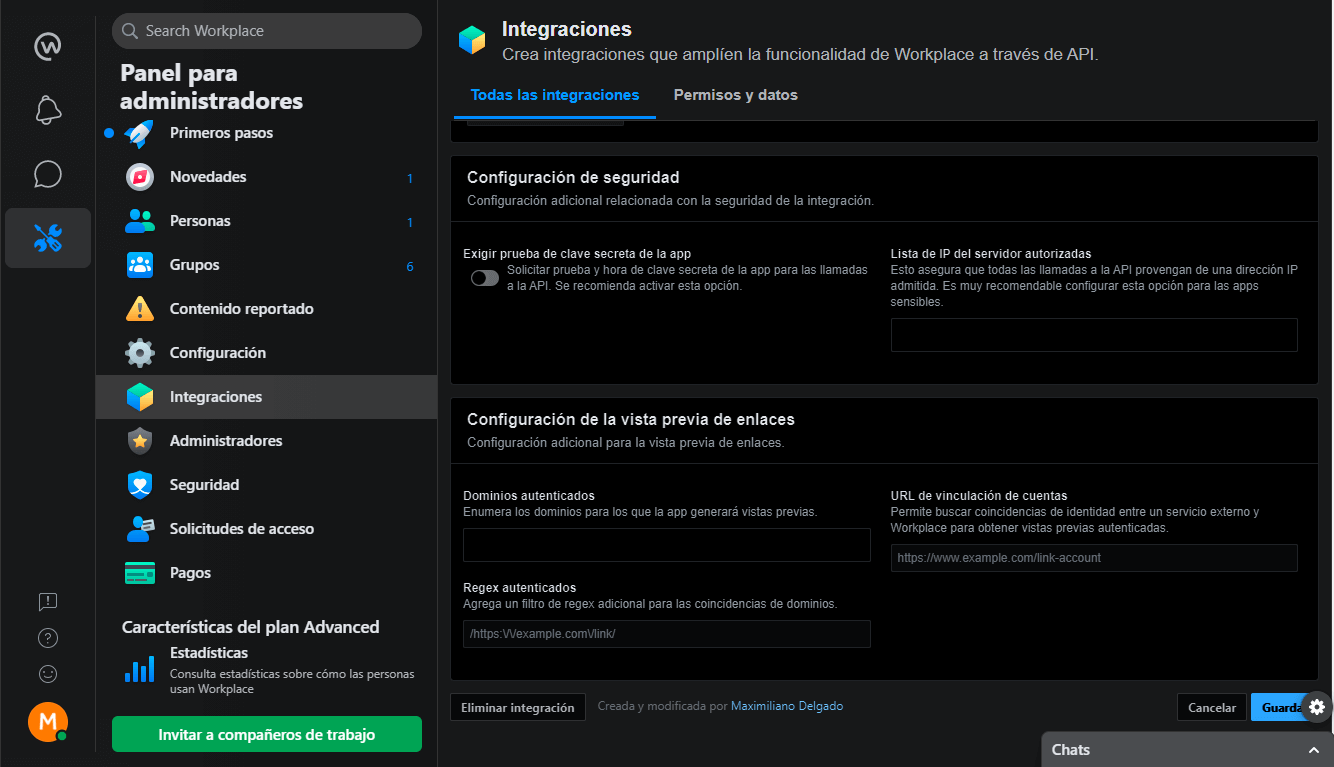
💬 Note: there is an optional configuration which is the security one, where it is required to enter the ip of the bot’s server, the domain, etc.
🔐 Security Configuration
To give more security to the application, both for Facebook and Workplace, it is important to have completed the environment variable appSecret and have set true the requireProof for the bot to work properly with these new settings.
For both cases, it is required to have the public IP of the server, since that way, it will only be limited to receive and send requests from a single authorized server.
If you have more than one public IP, or another server to balance the bot’s requests, you can add it to the list.
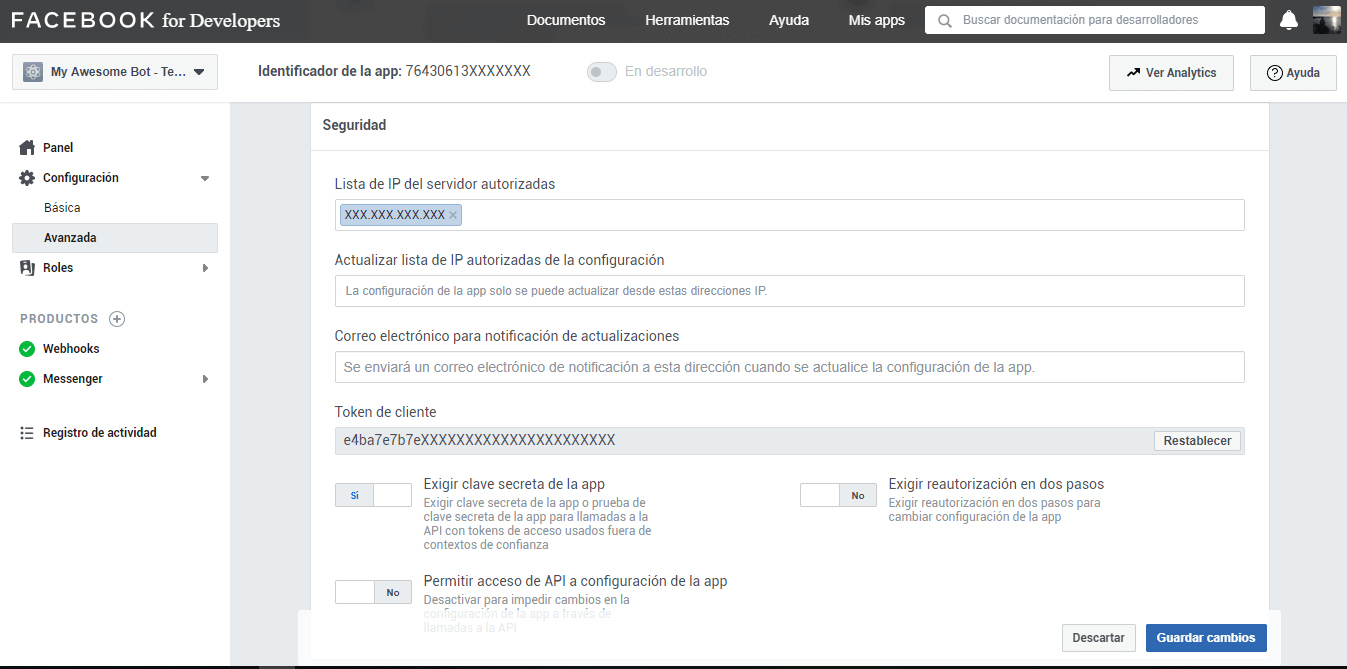
Facebook App
In the configuration of the app, we go to the left side menu and go to Settings > Advanced, and then down to the Security section, where we will enter our public IP, and then we will activate the option Require secret key of the app.
Workplace App
In the configuration of the app, we go down to the Security Settings section, where we will activate the option to require a secret key test of the app, and then we will enter our public IP.
🤦♂️Troubleshooting
Workplace App
❌ (#200) To subscribe to the messages field
(#200) To subscribe to the messages field, one of these permissions is needed: pages_messaging. To subscribe to the messaging_postbacks field, one of these permissions is needed: pages_messaging
You can solve this problem by configuring the webhook without selecting the subscriptions, then saving the configuration, then re-entering the app configuration and re-validating the webhook with the selected subscriptions.
💡 Contributing
Requests are welcome. For important changes, please open a topic first to discuss what you would like to change.
Please be sure to update the tests and documentation as appropriate.
This application is a starter for the creation of bots for Facebook Messenger and WorkChat (Workplace) for demonstration and education purposes. Its configuration is robust and scalable and can be used in a productive environment. Use this application to learn, experiment, retouch and practice the different options offered by the Facebook API.
For more information about the Facebook API you can read the documentation that the Messenger team prepared.
Messaging bots use a web server to process the messages they receive or to find out which messages to send. It is also necessary for the bot to be authenticated to talk to the web server and for the bot to be approved by Facebook to talk to the public.
When a person sends a message to a company in Messenger, the following happens, as long as the page uses an app to partially or completely automate the conversations. The Facebook server sends webhooks to the URL of the company’s server where the message app is hosted. That app can then reply to the person in Messenger using the Send API. This allows developers to create guided conversations for people to perform an automated process or develop an app that serves as a link between your agents and your company’s Messenger presence.
🤖 Live Demo
You can try some functions of the bot by entering here.
And you can try other kind of messages from the server documentation, don’t forget to get your ID from the chat bot persistent menu.
🙌 Let’s start
Before starting to work on our bot, we must have installed some tools in our computer that will facilitate us to work locally and be able to test some functionalities that the starter has available, and I will take for granted some basic concepts so as not to go into detail and extend the documentation.
When we have the basic requirements, we clone the repository, go to the project folder and install its dependencies.
npm install
We download the latest version of Ngrok compatible with our operating system, and decompress it in the server root.
⚙ Configurations
This application uses the config dependency to facilitate the configuration of environment variables, which makes it scalable and robust when deploying the application in different environments.
In the path ./config you will find a file called development.json which contains the settings for a local environment, while the file custom-environment-variables.json gets the key values of the environment variables displayed on the server.
Basically the file works as an object that is exported and can be consumed by invoking it in the file that requires consuming the loaded information.
If you need to add another type of data to consume, like the connection to a database, the url of some microservice, etc. you just have to add it to both files keeping the scheme.
You may find that you can’t configure some values for now, but that’s not a problem, when using the nodemon dependency, the server is in a watching state that at the slightest change of code, the server will run again.
See all available configuration properties in detail.
Server
url: It is the url of the server deployed in some environment, in the case of running it locally, you enter the url with ssl provided by ngrok.
Type: String
Default:
port: Is the port in which the application is deployed.
Type: Number
Default: 8080
context: It is the context from which the server’s api can be accessed, this way the routes in the main path of the application are not exposed.
Type: String
Default: /api
origins: The origins serve so that the application can only be consumed by reliable urls and avoid any kind of unwanted and malicious requests. You should write the urls separated with comma.
showLogInterceptor: Enables the display of the request interceptors in the logs.
Type: Boolean
Default: false
Params
fbApiVersion: Is the api version of facebook
Type: String
Default: v8.0
verifyToken: It is the verification token required by the application when invoked by facebook, this token is private and should not be exposed.
Type: String
Default: my_awesome_bot_verify_token
appSecret: It is the secret key to the app, it is required if you are going to use the security settings for the requests.
Type: String
Default:
accessToken: The access token is the alphanumeric hash that is generated when you create the application on Fecebook or Workplace.
Type: String
Default:
subscribedFields: Are the permissions required to subscribe to the application in order to interact with the user. These permissions are only required for Facebook bots and must be typed separately by comma.
userFields: It is a comma-separated list to obtain the user’s information.Documentation
Type: String
Default: id,name,first_name,last_name,email
secrets: Here you can enter any value you want to hide in the server logs of the bot, for example the id of the sender or the id of the sender. The values to hide must be written separated by comma.
Type: String
Default:
requireProof: Enables or disables the use of appsecret_proof and appsecret_time for security requests, it is required to have configured the secret key of the app to work.
Type: Boolean
Default: false
services
fbApiUrl: It is the url of the Graph API of Feacebook
Type: String
Default: https://graph.facebook.com
swagger
enabled: Enable or disable the documentation of the bot’s server endpoints with swagger.
Type: Boolean
Default: true
💻 Run server
We start the bot’s server.
npm run start
Once the server is started, we must start ngrok to create the connection tunnel between the bot’s local server and the Facebook server.
./ngrok http 8080
Windows
./ngrok.exe http 8080
To see other tunnel configurations, you can check the documentation
📚 Swagger
The project has a Swagger that has documented the most important endpoints of the project, and facilitates the configuration of the fields for the bot, such as the get started button, persistent menu and the greeting.
This documentation can be enabled or disabled from the configuration files.
Default: http://localhost:8080/api-docs
URL Scheme
<http|https>://<server_url><:port>/api-docs
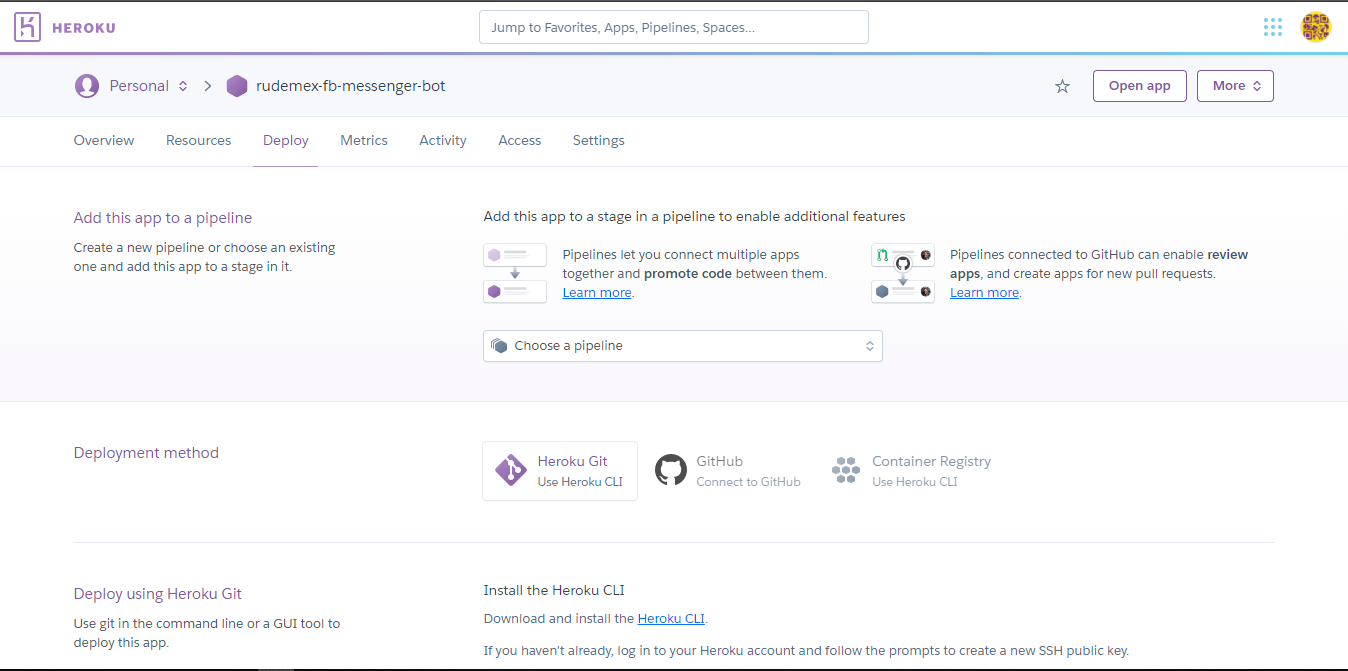
🖥️ Deploy server in heroku (free)
You can run the bot server in a productive environment on any node server, in this case I will explain the steps to raise the server on the platform Heroku, which has a free version to deploy node servers, you can also hire a paid service which gives you more features.
We will need a file called Procfile, which is the one Heroku will use to initialize the server once deployed.
Its content is:
web: npm start
After logging into Heroku, click on Create new app
We write the name of our app, and select a region, and then click on Create App.
💬 note: Remember to save the name of the app, as you will need it later to replace the value of <app_name> with the name of the app.
Heroku gives you several options to deploy your server. You can do it with Heroku CLI by following the steps in the documentation, or you can deploy it directly from Github, which is much easier.
For existing repositories, simply add the heroku remote
heroku git:remote -a <app_name>
Deployment method: GitHub
We click on the connect to GitHub button, if you’ve never connected Heroku to Github, a window will open to authorize the connection so you can continue with the step of entering the name of the repository and searching it in your GitHub account, and once you find it, we click on the Connect button.
Then we select the branch we want to deploy, and click on Deploy Branch, and it will start running the deployment, downloading the code from the repository, installing the dependencies, etc.
Now we have to configure the environment variables of the server, although we can do it manually from Settings > Config Vars, there is a bash script prepared that will raise the environment variables of our .env file that is located in the ./variables folder.
npm run heroku:envs
or
bash heroku-envs.sh
📱 Setup the Facebook App
The time has come to create and configure our app on Facebook.
With the local server and the connection tunnel initialized, we will configure the app, and with the information that it will give us we will finish configuring the data that we are missing in the bot’s server.
💬 Remember that the bot’s server is in watch mode, and any changes made will be re-initialized and take the changes made.
Enter Facebook Developers and click on create app, it will open a modal to select the type of application, in our case we will create an application type “Manage business integrations“.
Now we will have to make some basic settings for the application.
We assign a name of the app to identify it, we put a contact email, we select the purpose of the app, in this case is for us, and if we have a commercial administrator account, we select one from the list, if you do not have such an account, you can create it later.
Once the information is completed, we click on Create App identifier
Then we look for Messenger in the app’s product list, and hit the configure button.
Now we are going to make the two necessary and essential configurations to be able to connect Facebook with our bot server.
Access tokens
In this part of the configuration, we will be able to manage which page or pages of facebook will have the bot available.
We click on Add or Remove pages, and select the page.
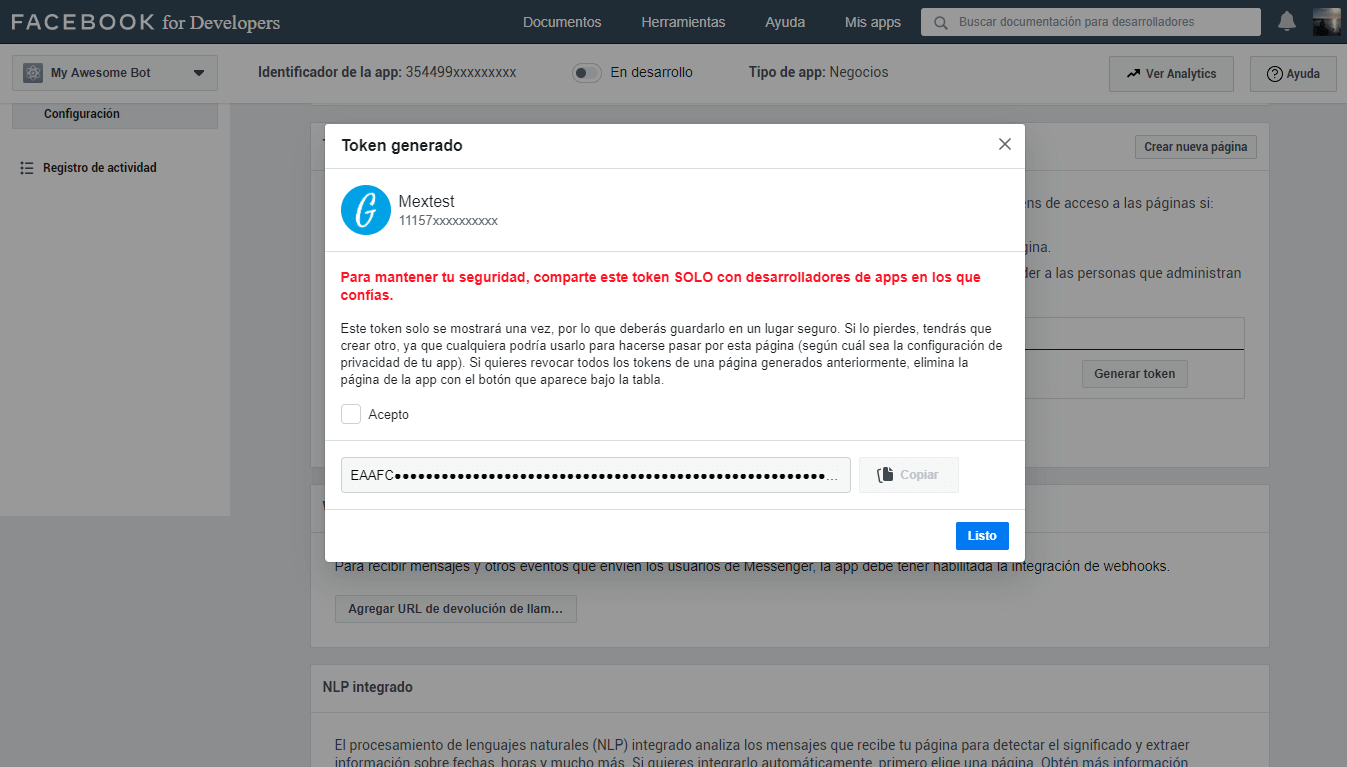
Once the page is linked to the app, we have to generate the token by clicking on the button Generate Token, and a window will open where you give us some instructions about the token.
We must check accept in order to view the full hash, then copy it and place it in the configuration of our server, if it is for development it is put in the json of ./config/development.json in the key of accessToken, and if it is for a productive environment, we must put it in the envs file in ./variables.
Now we have to configure the connection between Facebook and our server through Webhook, for this, you must have at hand the verifyToken that you configured and the bot’s server url, in this case, we will use the one provided by ngrok with ssl.
https://<id_tunnel>.ngrok.io/api/webhook/
Then click on Verify and Save, and if everything goes well, in the server terminal you should see the successful subscription message.
If the url of the webhook by ngrok changes, or you want to configure the url of the productive server, you can do it by clicking on the button Edit Callback URL and perform again the previous steps.
Add subscriptions
Now we have to add the subscriptions that will allow the bot to have certain permissions to perform the actions we need.
For that we click on the button Add subscriptions
Select from the list the basic permissions and click on Save
Then we add each permission to the configuration files separated by a comma.
These are the last settings to be made and are optional.
It consists in executing a curl script in the terminal to implement some options, don’t forget to put the access token to make it work.
💬 Note: You can run these scripts from Swagger, but you must adjust the files that are inside the ./templates/configs folder
We have finished configuring the app so that Facebook connects to the bot’s server, now we have to test it, to do this we can enter the chat page and perform a test to verify that everything is working properly.
📡 How to share your bot
Add a chat button to your webpage, go here to learn how to add a chat button your page.
🔗 Create a shortlink
You can use page username to have someone start a chat.
https://m.me/<PAGE_USERNAME>
📱 Setup the Workplace App
The configuration of the app for Workplace is quite similar to that of Facebook, it is required to have the Workplace paid account in order to enable custom integrations.
Go to the Administrator Panel, and click on the Integrations button, and in the Custom integrations section click on the Create custom integration button.
It will open a modal where we must write the name of the application and a description, then click on Create.
Once the application is created, it takes us to the configuration page of the application.
Access token
Now we are going to generate an access token and then configure it in our config, as mentioned in the configuration of the Facebook app.
Now let’s select the permissions for our bot.
Permissions
In our case we are interested in the option of Sending a message to any member.
Now we are going to grant the integration access to groups, in this case it is going to be to a specific group.
And finally, we have to configure the Webhook and the verify token and select the subscriptions we need, as we did with the Facebook app.
💬 Note: depending on the webhook configuration you select in the tabs, the subscriptions will change.
🙌 Finally we click on the save button.
💬 Note: there is an optional configuration which is the security one, where it is required to enter the ip of the bot’s server, the domain, etc.
🔐 Security Configuration
To give more security to the application, both for Facebook and Workplace, it is important to have completed the environment variable appSecret and have set true the requireProof for the bot to work properly with these new settings.
For both cases, it is required to have the public IP of the server, since that way, it will only be limited to receive and send requests from a single authorized server.
If you have more than one public IP, or another server to balance the bot’s requests, you can add it to the list.
Facebook App
In the configuration of the app, we go to the left side menu and go to Settings > Advanced, and then down to the Security section, where we will enter our public IP, and then we will activate the option Require secret key of the app.
Workplace App
In the configuration of the app, we go down to the Security Settings section, where we will activate the option to require a secret key test of the app, and then we will enter our public IP.
🤦♂️Troubleshooting
Workplace App
❌ (#200) To subscribe to the messages field
(#200) To subscribe to the messages field, one of these permissions is needed: pages_messaging. To subscribe to the messaging_postbacks field, one of these permissions is needed: pages_messaging
You can solve this problem by configuring the webhook without selecting the subscriptions, then saving the configuration, then re-entering the app configuration and re-validating the webhook with the selected subscriptions.
💡 Contributing
Requests are welcome. For important changes, please open a topic first to discuss what you would like to change.
Please be sure to update the tests and documentation as appropriate.